You might have driven a car, but have you ever wondered how the engine works? Similarly if you have used Kubernetes and if you are interested to know how a pod works, this blog post is the right place to start with.
Pods are the smallest deployable units of computing that you can create and manage in Kubernetes. Pods are eventually like building blocks in Kubernetes which runs the show.
A driver can drive a car even if he doesn’t know how the engine works, or how the gearbox works, the only requirement is to know driving. Similarly, in Kubernetes, users can run applications on Kubernetes without knowing how the pod works at a lower level. Kubernetes is well-evolved and abstracts so many things that the only requirement is to know how to use and manage things in Kubernetes ( similar to driving). However, knowing the underlying granular details would be fun and it might help in some rare scenarios where having this additional knowledge might help you in troubleshooting issues.
What is a pod and how does it work?
Before we go into the pod, Let’s see what a container is.
Containers
Before coming into a pod, we need to understand what a container is. To understand containers better, let’s take an example of a good old restaurant serving delicious pizza. Imagine a restaurant with multiple family dining areas, each well separated by walls and giving sufficient privacy for the diners. Some of the dining areas are small, and some are bigger.
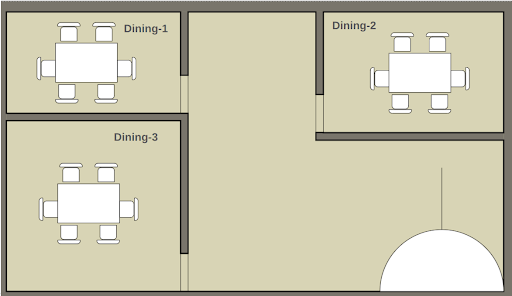
Each dining area is separated by walls and they have total privacy. People from one dining area cannot know what the people from other dining areas are doing or eating, there is a proper ISOLATION.
Even though the dining areas are private, the number of pizzas being served and the flavors available are totally controlled by the restaurant. This also depends on the capacity of the restaurant. For example, if the restaurant can make only 10 fresh pizzas per hour ( maybe I am too pessimistic 😛 ) ,if people in one of the dining areas need all 10 pizzas immediately, it’s impossible to serve them all. Another example is, if the restaurant is short-staffed on a holiday, they might have to close one of the dining areas. This effective RESOURCE CONTROL is essential for a restaurant to function properly.
Among many factors, the two important ones that help the restaurant to run efficiently are
- ISOLATION
- RESOURCE CONTROL
Let’s use a similar analogy to Kubernetes.
Compare the restaurant to a Kubernetes node and each of the dining areas to a container. So, what is a container? In simple terms, a container is just a process running on a machine. Processes have been running on machines for ages, so what’s unique with the containers? This is where the 2 important factors, isolation and resource control come into play.
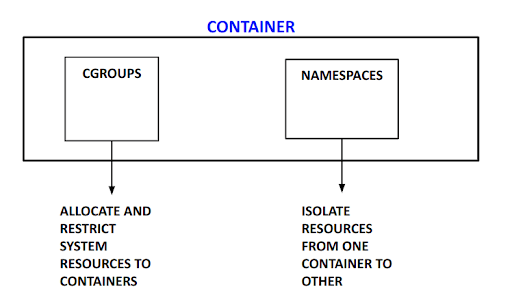
Linux manages the isolation and resource control with the following Linux Kernel Features.
Namespaces wrap a global system resource in an abstraction that makes it appear to the processes within the namespace that they have their own isolated instance of the global resource. Like how walls provide isolation in the restaurant, namespaces provide isolation for the processes. Separate file systems ensure that containers have their own set of files which is totally isolated from other containers/processes.
Cgroups (Control groups) limit and manages the resource usage (CPU, memory, disk I/O, etc) of a collection of processes. For example, the restaurant ensures pizza is served fairly to all customers in all dining areas based on the size and order. Cgroups ensure proper resource control in the system
Let’s look into each one of the above factors in more detail.
Namespaces
If you have used the “unshare” command in Linux, you are probably already familiar with namespaces. Linux provides namespaces for the isolation of the following namespaces.
-
- Mount: Allows processes to have different mount points.
- UTS(Unix Time Sharing): Allows processes to have separate hostnames.
- IPC( Inter Process Communication) ensures that processes running in one namespace are isolated from processes running in other namespaces.
- Network: Allows processes to have separate virtual networks.
- PID: Enables processes in namespaces to have their own PID, which means processes in namespaces can have their own PID 0 process.
- Cgroup: Enables processes in the namespace to have their own cgroup hierarchy.
- Time: Allows processes in the namespace to be in a different timezone.
- User: Allows to have different users in a namespace
By leveraging the namespaces, it is possible to have isolation in the areas mentioned above. Containers eventually being a process leverages namespaces to have isolation between containers and the machine where it is running on.
To check the namespaces on the host machine, run the command “lsns”. In the example below, I will run a container with name “nginx” and check the namespaces associated.
As seen, all the namespaces are created to isolate the container except for the time and user namespace.
|
1 2 3 4 5 6 7 8 9 10 11 12 13 |
Run a nginx container # docker run -d --name nginx nginx c9a8873cdb82e8832e2a322c597d1afb196ac2343e37afaffab450d7ea81e1ec # lsns | grep nginx 4026532284 mnt 3 100805 root nginx: master process nginx -g daemon off; 4026532285 uts 3 100805 root nginx: master process nginx -g daemon off; 4026532286 ipc 3 100805 root nginx: master process nginx -g daemon off; 4026532287 pid 3 100805 root nginx: master process nginx -g daemon off; 4026532288 net 3 100805 root nginx: master process nginx -g daemon off; 4026532357 cgroup 3 100805 root nginx: master process nginx -g daemon off; ... |
File system
It is important for containers to see their own set of files. Imagine modifying a file in one container, which would change the file in other containers, too. This would be disastrous.
To prevent this each container has a separate mount namespace, which means all the mounts seen by a container have a different file system from the host and other containers. This means each container will have its own root file system.
For optimization, union filesystems like btrfs,overlay2 are used to treat files as layers. More information about how this works can be found here.
Let’s check the files on the host where the containers are run and within the container.
Files at host
|
1 2 |
# ls / bin boot dev etc home lib lib64 local media mnt opt proc root run sbin srv sys tmp usr var |
Files inside container
|
1 2 3 4 5 6 7 |
# docker exec nginx sh -c "ls /" # Files within container bin boot dev docker-entrypoint.d docker-entrypoint.sh ... |
As seen, the above container has a different root file system than the host.
Cgroups
Cgroups provide a unified and hierarchical way to control and monitor various system resources used by processes. The key resources managed by cgroups v2 include:
- CPU: Controls the CPU usage of processes. This includes:
- CPU Shares: Proportional CPU time distribution among cgroups.
- CPU Bandwidth: Limits the maximum CPU time a group can use over a period.
- CPU Set: Binds processes to specific CPUs.
- Memory: Manages the memory usage of processes. This includes:
- Memory Limits: Set maximum usage for memory, swap, and kernel memory.
- OOM Control: Controls the Out-Of-Memory (OOM) behavior.
- Memory Pressure Notifications: Notifies when memory usage is high.
- I/O: Controls block I/O operations (disk I/O) for processes. This includes:
- I/O Weight: Proportional bandwidth allocation for block devices.
- I/O Limits: Set limits on read and write operations.
- PIDs: Limits the number of processes (PIDs) that can be created within a cgroup.
- Devices: Controls access to devices, allowing or denying access to specific devices.
- Network: Manages network resources and usage. This includes:
- Network Classifiers: Assigns network traffic to specific classes.
- Network Priorities: Sets priority for network traffic.
- RDMA: Controls the usage of RDMA (Remote Direct Memory Access) resources.
- HugeTLB: Manages the usage of HugeTLB pages, which are large memory pages used by applications requiring large contiguous memory allocations.
More information on the controllers can be found here.
Let’s check how it looks in the system.
|
1 2 3 4 5 6 |
Check the pid of nginx container process # ps -ef | grep nginx # root 654835 654813 0 07:09 ? 00:00:00 nginx: master process nginx -g daemon off; 101 654880 654835 0 07:09 ? 00:00:00 nginx: worker process 101 654881 654835 0 07:09 ? 00:00:00 nginx: worker process ... |
Let’s check the entry memory.max to see the hard limit of the container. This can be done by getting the cgroup hierarchical files associated with the process and then checking the value of file memory.max.
|
1 2 3 4 5 6 7 8 |
Check the cgroup files of the nginx process with pid 654835 # cat /proc/654835/cgroup 0::/system.slice/docker-c9a8873cdb82e8832e2a322c597d1afb196ac2343e37afaffab450d7ea81e1ec.scope Check the memory limit set with the cgroup # cat /sys/fs/cgroup/system.slice/docker-c9a8873cdb82e8832e2a322c597d1afb196ac2343e37afaffab450d7ea81e1ec.scope/memory.max max |
As expected, the value of memory.max is max because no limits were set on the container.Now let’s try running the container with set memory limits.
|
1 2 3 4 5 6 |
Kill the previous instance of nginx container and start a new nginx container with 512MB limit # docker stop nginx;docker rm nginx nginx nginx # docker run -d --name nginx -m 512m nginx 3fd3a592979a50dac48d1e0faad5298cae97cc9d615f029482703f6266e2153c |
Let’s repeat the same process of getting the cgroup hierarchy and checking the value of memory.max file.
|
1 2 3 4 5 6 7 8 9 10 11 12 |
# ps -ef | grep nginx root 672354 672330 0 07:43 ? 00:00:00 nginx: master process nginx -g daemon off; 101 672397 672354 0 07:43 ? 00:00:00 nginx: worker process 101 672398 672354 0 07:43 ? 00:00:00 nginx: worker process # cat /proc/672354/cgroup 0::/system.slice/docker-3fd3a592979a50dac48d1e0faad5298cae97cc9d615f029482703f6266e2153c.scope # cat /sys/fs/cgroup/system.slice/docker-3fd3a592979a50dac48d1e0faad5298cae97cc9d615f029482703f6266e2153c.scope/memory.max 536870912 |
As seen above the memory limit is set to 512MB and any usage beyond 512MB will trigger an OOM kill.
A deep dive into pods
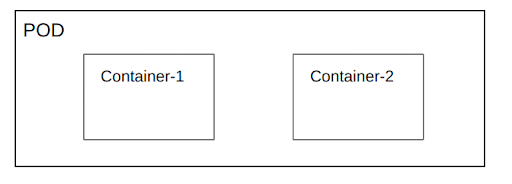
Now that we know what a container is, let’s dig into what a pod is. A pod is simply a logical grouping of one or more containers.
Containers belonging to a pod have a separate mount namespace and pid namespace (configurable to use share same pid namespace among containers of pod), other namespaces remain same.
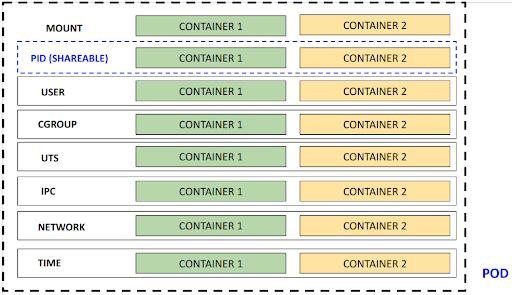
User namespace separation is now in beta and pretty soon user namespace will be different.
Resource control through cgroups also follow a hierarchical structure from pods to containers, which means resources allocated to the pod are a cumulation of resources allocated to the containers.
/
.
—sys/fs/cgroup
|— Pod-1
|— Container-1
|— Container-2
In addition, pods have several resources that are used to manage and deploy containers effectively. Here are some of the key resources:
Networking and storage
- Networking: Each pod in a Kubernetes cluster has a unique IP address, much like each house on a street has its own address. This unique IP address allows pods to communicate with other pods in the cluster, ensuring smooth and efficient data exchange.
- Storage: Pods can have persistent storage volumes that are shared by all containers in the pod. Think of this as a shared pantry in a kitchen where all chefs can access the ingredients they need. This shared storage ensures that data is consistently available to all containers within the pod, facilitating seamless operation and data management.
Pod security and management
Pods have several security and management features that make it easier to manage and deploy containers. Here are some of the key features:
- Security Context: Pods have a security context that defines the security settings for the pod, such as the user ID and group ID. This is akin to assigning specific roles and permissions to staff in a restaurant, ensuring that each person has the appropriate level of access and responsibility.
- Pod Metadata: Pods have metadata that provides information about the pod, such as the name and namespace. This metadata acts like a detailed menu, offering insights into the pod’s configuration and purpose, making it easier to manage and troubleshoot.
- Pod Templates: Pods have templates that define the configuration of the pod, such as the container runtime and image. These templates are like recipes that ensure each pod is created with the correct ingredients and instructions, maintaining consistency across deployments.
- API Server: Pods interact with the API server to manage the lifecycle of the pod, such as creating and deleting pods. The API server acts as the head chef, coordinating the activities of all pods in the cluster and ensuring they operate smoothly.
- Control Plane: Pods are managed by the control plane, which is responsible for managing the lifecycle of pods and other resources in the cluster. The control plane is like the restaurant manager, overseeing the entire operation and ensuring everything runs efficiently.
- Sidecar Containers: Pods can have sidecar containers that provide additional functionality, such as logging and monitoring. These sidecar containers are like sous-chefs, assisting the main containers and ensuring that all necessary tasks are handled.
- Pod Remains: Pods can remain in a running state even if one of the containers in the pod fails. This resilience is like a restaurant continuing to operate smoothly even if one chef is temporarily unavailable.
- Multiple Co-Located Containers: Pods can have multiple co-located containers that share resources and dependencies. This co-location is similar to having multiple chefs working together in the same kitchen, sharing tools and ingredients to create a cohesive dining experience.
- Kubernetes Node: Pods are deployed on a Kubernetes node, which is a physical or virtual machine that runs the Kubernetes software. The node is like the restaurant building, providing the infrastructure needed to host and run the pods.
- Single Pod: Pods can be created as a single pod, or multiple pods can be created to provide high availability and scalability. This flexibility is like being able to open additional dining areas in a restaurant to accommodate more guests.
- Creating Pods: Pods can be created using the kubectl create command, or by using a deployment or other workload resource. This process is like setting up a new dining area in a restaurant, ensuring that everything is in place for smooth operation.
- Kubernetes Cluster: Pods are deployed in a Kubernetes cluster, which is a group of nodes that work together to provide a scalable and highly available environment. The cluster is like a chain of restaurants, each contributing to the overall success and efficiency of the operation.
- New Pod: A new pod can be created by using the kubectl create command, or by using a deployment or other workload resource. This is like opening a new dining area or restaurant location, expanding the capacity and reach of your services.
- Create Pods: Pods can be created using the kubectl create command, or by using a deployment or other workload resource. This flexibility ensures that you can easily scale and manage your applications as needed.
- Pod Templates: Pods have templates that define the configuration of the pod, such as the container runtime and image. These templates ensure that each pod is created consistently, much like following a standardized recipe in a restaurant.
A deep dive into Kubernetes pods, a conclusion
- Using containers is a simple process; they have proper isolation with namespaces and resource control with cgroups.
- A pod is a group of one or more containers.
- Containers of the pod have a different mount namespace.
- Containers of the pod may or may not share the pid namespace depending on the configuration done by the user.
- Pods are fun 🙂
Ready to elevate your Kubernetes management? Check out Percona Everest for seamless database control on Kubernetes, offering automated scaling, unified management, and open source flexibility.
FAQs
1. How do containers achieve isolation in a Linux environment, and what role do namespaces play in this process?
Containers achieve isolation in a Linux environment primarily through the use of namespaces. Namespaces are a feature of the Linux kernel that partition kernel resources, making it appear to processes within a namespace that they have their own isolated instance of the global resource. There are several types of namespaces that contribute to container isolation:
- a) Mount namespace: Allows processes to have different views of the filesystem hierarchy. b) UTS namespace: Allows each container to have its own hostname and domain name. c) IPC namespace: Isolates inter-process communication resources. d) Network namespace: Provides isolation of network interfaces, routing tables, and firewall rules. e) PID namespace: Allows processes in different namespaces to have the same PID. f) User namespace: Allows mapping of user and group IDs between the host and the container. g) Cgroup namespace: Provides a virtualized view of the cgroup hierarchy. h) Time namespace: Allows processes to see different system times.
By leveraging these namespaces, containers can run isolated from each other and from the host system, enhancing security and preventing conflicts between applications.
2. What is the significance of cgroups in container resource management, and how do they work in practice?
Cgroups (Control Groups) play a crucial role in container resource management by providing a unified and hierarchical way to control and monitor various system resources used by processes. The significance of cgroups lies in their ability to:
- a) Limit resource usage: Cgroups can set hard limits on resources like CPU, memory, and I/O, preventing a single container from consuming all available resources. b) Prioritize resources: They allow for the prioritization of resource allocation among different containers or groups of containers. c) Account for resource usage: Cgroups provide detailed accounting of resource usage, which is valuable for monitoring and billing purposes. d) Isolate resources: They help in isolating the resource view of a group of processes from the rest of the system.
In practice, cgroups work by organizing processes into hierarchical groups and then applying resource limitations to these groups. For example:
- CPU limitations can be set using parameters like cpu.shares (for relative CPU time allocation) or cpu.cfs_quota_us (for absolute CPU time limits).
- Memory limitations can be set using memory.limit_in_bytes to restrict the total amount of memory a container can use.
- I/O limitations can be applied using parameters like blkio.weight to control the relative proportion of block I/O bandwidth allocated to different containers.
These settings are typically managed by container runtimes like Docker or containerd, which interface with the cgroup filesystem to apply the desired resource controls.
3. How does the file system isolation in containers work, and what are the benefits of using union file systems?
File system isolation in containers works through the use of mount namespaces and layered file systems. Each container gets its own mount namespace, which provides an isolated view of the file system. This means that changes made to the file system within a container do not affect the host system or other containers.
The benefits of using union file systems, such as OverlayFS or AUFS, include:
- a) Efficiency: Union file systems allow multiple read-only layers to be combined with a writable layer, which significantly reduces disk space usage and speeds up container creation. b) Immutability: The base layers of a container image can be kept read-only, ensuring consistency across multiple instances of the same container. c) Quick updates: When updating a container image, only the changed layers need to be transferred, reducing network usage and speeding up deployments. d) Shared resources: Common base layers can be shared among multiple containers, further optimizing resource usage.
In practice, when a container is started:
- The read-only layers of the container image are mounted.
- A new, thin writable layer is created on top of these layers.
- Any changes made by the container are written to this writable layer, leaving the underlying layers untouched.
- When the container is removed, only the thin writable layer needs to be deleted, making cleanup quick and efficient.
This approach allows for efficient use of storage, quick container startup times, and the ability to easily share common base images across multiple containers.
4. What is the relationship between pods and containers in Kubernetes, and how does this affect resource allocation and namespace sharing?
In Kubernetes, a pod is the smallest deployable unit and represents a logical group of one or more containers. The relationship between pods and containers is crucial for understanding how Kubernetes manages workloads:
- a) Grouping: Containers within a pod are always scheduled together on the same node and share the same lifecycle. b) Resource sharing: Containers in a pod share certain namespaces, allowing them to communicate more efficiently. c) Storage: Containers in a pod can share storage volumes, facilitating data sharing between applications.
This relationship affects resource allocation and namespace sharing in several ways:
- Resource Allocation:
- Resources are primarily allocated at the pod level.
- The total resources available to a pod are the sum of the resources requested by all its containers.
- Kubernetes uses these pod-level resource requests and limits for scheduling decisions.
- Namespace Sharing:
- Network namespace: All containers in a pod share the same network namespace, meaning they share the same IP address and port space. This allows containers within a pod to communicate via localhost.
- IPC namespace: Containers in a pod can share the same IPC namespace, enabling inter-process communication between containers.
- UTS namespace: Containers in a pod typically share the same UTS namespace, allowing them to share the same hostname.
- PID namespace: By default, containers in a pod do not share the PID namespace, but this can be enabled, allowing containers to see and signal processes in other containers within the pod.
- Mount namespace: Each container has its own mount namespace, but volumes can be shared between containers in a pod.
- Cgroup Hierarchy:
- The cgroup hierarchy follows a pod-container structure, where the pod’s cgroup is the parent of its containers’ cgroups.
- This allows for both pod-level and container-level resource controls.
Understanding this relationship is crucial for effective application design and resource management in Kubernetes environments.
5. How do user namespaces enhance container security, and what are the implications of their recent introduction in Kubernetes?
User namespaces enhance container security by providing an additional layer of isolation between the container and the host system. They work by mapping user and group IDs inside the container to different IDs on the host system. The key benefits and implications of user namespaces include:
- Enhanced Security:
- Root in the container can be mapped to a non-root user on the host, reducing the risk of privilege escalation attacks.
- Even if an attacker gains root access within a container, they still have limited privileges on the host system.
- Reduced Attack Surface:
- User namespaces limit the potential impact of vulnerabilities in container runtimes or applications.
- They provide an extra barrier against container breakout attacks.
- Fine-grained Access Control:
- Administrators can assign specific ranges of UIDs and GIDs to different containers, allowing for more granular control over resource access.
- Compatibility Challenges:
- Some applications may assume they are running as root and may not function correctly in a user namespace.
- Existing security policies and tools may need to be updated to account for user namespace mappings.
- Performance Considerations:
- There can be a small performance overhead associated with user namespace mappings, particularly for operations that frequently cross the namespace boundary.
The recent introduction of user namespaces in Kubernetes (currently in beta) has several implications:
- a) Improved Security Posture: Kubernetes clusters can now benefit from the additional isolation provided by user namespaces, enhancing overall security.
- b) Configuration Complexity: Cluster administrators need to carefully configure user namespace mappings to balance security and functionality.
- c) Application Compatibility: Some applications may need to be modified or configured differently to work correctly with user namespaces enabled.
- d) Monitoring and Auditing: Security tools and practices may need to be updated to accurately track and audit activities across user namespace boundaries.
- e) Gradual Adoption: As a beta feature, it allows for gradual adoption and testing in Kubernetes environments, enabling organizations to assess the impact and benefits before full production use.
As user namespaces become more widely adopted in Kubernetes, they are expected to significantly enhance the security posture of containerized applications, albeit with some initial complexity in configuration and potential application adjustments.
About the Author
 Chetan Shivashankar
Chetan is passionate about Kubernetes and well versed with Infrastructure and Devops Philosophy. He is playing a key role on running Database on Kubernetes at Percona.