Percona has a great set of tools known as the Percona Toolkit, one of which is pt-upgrade. The idea behind this tool is to replay a captured sequence of queries that were executed on a different database server. This is very useful to validate if a new version of the database server works as expected with your application.
Pt-upgrade can process queries from different sources, such as the general log or the slow log. However, there are some issues with these sources. Enabling the general log can impact the server’s performance; it can grow very fast and must be collected on the database server. The slow log has the same issues as the general log if we set a low threshold, and if we set a high threshold, we will miss many queries.
Luckily, pt-upgrade can also process the output of a network capture file (pcap). This is a great option because we can capture the traffic on the application server without impacting the database server. The problem is that most of the time, the traffic between the application and the database server is encrypted using TLS. So, how can we decrypt this traffic to be able to use pt-upgrade?
Spoiler alert: There is a method to decrypt TLS traffic, but this method can’t be used to feed pt-upgrade. At least it can be used currently. The reason is that Wireshark can decrypt TLS traffic, but it does not support exporting the decrypted traffic to a pcap file. If you know how to do it, please let me know.
During my research, I found that Wireshark can decrypt TLS traffic if we provide it with the TLS session keys.
How does TLS encryption work?
I don’t know, but it really does not matter for the purpose of this blog post. You just need to know that TLS negotiates session keys that are used to encrypt the traffic between the client and the server. These session keys are generated during the TLS handshake and are unique for each session. Wireshark can use these keys to decrypt the traffic. But for security reasons, these keys are not stored anywhere.
So, to decode the traffic, we need some secret keys that are ephemeral and not stored anywhere.
The good news is that OpenSSL (the library used by most applications to implement TLS) has a feature that allows an application to retrieve the keys. The bad news is that this feature is not implemented by any of the database clients. It is not enabled for MySQL or PostgreSQL.
It is enabled for curl, but I don’t know how to use curl to connect to a database server.
Wouldn’t it be great if we could enable this feature without modifying the database client? As Obama used to say, and most of the Crypto Bros believe: Yes, we can!
How? Using a dynamic library shim.
What is a Dynamic Library Shim?
A dynamic library shim is a shared library loaded before the target library. The shim intercepts some or all of the function calls from the original library to perform ad hoc processing and can optionally forward the calls to the original library.
Shims are used to:
- Modify or override the behavior of existing libraries.
- Add tracing, profiling, logging, or safety checks.
- Work around bugs or limitations.
- Provide compatibility between ABI/API versions.
How does it work?
On Unix-like systems, this is achieved using the LD_PRELOAD environment variable. This variable tells the operating system’s dynamic linker: “Before you load any other library, load this one first.”
Because the shim is loaded first, it can define functions with the exact same names as the functions in the real library. The linker will find the function in the shim first and use it instead of the one in the real library.
Writing the shim library to capture TLS keys
Lazy as I am, I asked ChatGPT to write a shim library for me. After some reviews, corrections, and improvements, here is the final code. Just note that most of the comments were added by me, not by the AI. AIs lack the fine sense of humor that I have.
|
1 2 3 4 5 6 7 8 9 10 11 12 13 14 15 16 17 18 19 20 21 22 23 24 25 26 27 28 29 30 31 32 33 34 35 36 37 38 39 40 41 42 43 44 45 46 47 48 49 50 51 52 53 54 55 56 57 58 59 60 61 62 63 64 65 66 67 68 69 70 71 72 73 74 75 76 77 78 79 80 81 82 83 84 85 86 87 88 89 90 91 92 93 94 95 96 97 98 99 100 101 102 103 104 105 106 107 108 109 110 111 112 113 114 115 116 117 118 119 120 121 122 123 124 125 126 127 128 129 130 131 132 133 134 135 136 137 138 139 140 141 142 143 144 145 146 147 148 149 150 151 152 153 154 155 156 157 158 159 160 161 162 163 164 165 166 167 168 169 170 171 172 173 174 175 176 177 178 179 180 181 182 183 184 185 186 187 188 189 190 191 192 193 194 195 196 197 198 199 200 201 202 203 204 205 206 207 208 209 210 211 212 213 214 215 216 217 218 219 220 221 222 223 224 225 226 227 228 |
/* * shim.c - A dynamic library shim to capture TLS keys for Wireshark * * This library intercepts SSL_CTX_new and SSL_CTX_new_ex calls to install a * keylog callback that writes TLS session keys to a file specified by the * SSLKEYLOGFILE environment variable. This allows tools like Wireshark to * decrypt TLS traffic for analysis. * * Usage: * 1. Compile this file into a shared library: * gcc -shared -fPIC -o shim.so shim.c -ldl -lpthread -lssl * 2. Set the SSLKEYLOGFILE environment variable to the desired log file path: * export SSLKEYLOGFILE=/path/to/your/keylogfile.log * 3. Preload the shim library when running your application: * LD_PRELOAD=/path/to/shim.so your_application * * Note: This code is intended for debugging and analysis purposes only. * It should not be used in production environments due to potential * security and performance implications. * * shim.c © 2025 by Pep Pla and "friends" is licensed under Creative Commons * Attribution-ShareAlike 4.0 International. To view a copy of this license, * visit https://creativecommons.org/licenses/by-sa/4.0/ */ #define _GNU_SOURCE #include #include #include #include #include #include #include <openssl/ssl.h> static FILE *keylog_fp = NULL; /* pointer to the keylog file */ /* multithreaded safety */ static pthread_once_t keylog_once = PTHREAD_ONCE_INIT; /* to ensure that keylog_init_once is called only once */ static pthread_mutex_t keylog_mutex = PTHREAD_MUTEX_INITIALIZER; /* to prevent concurrent writes to the keylog file */ /* keylog initialization */ static void keylog_init_once(void) { const char *path = getenv("SSLKEYLOGFILE"); // if path is not set or empty, do nothing if (!path || !*path) return; // open the file in append mode, create it if it doesn't exist, with permissions 0600 int fd = open(path, O_WRONLY|O_CREAT|O_APPEND|O_CLOEXEC, 0600); // if we can't open the file, do nothing if (fd < 0) return; // convert the file descriptor to a FILE pointer and set it to line buffered FILE *fp = fdopen(fd, "a"); // again, if we can't convert it, close the fd and do nothing if (!fp) { close(fd); return; } // we set line buffering, this could be a problem if we're going to write a lot of keys very fast // but this code is meant for debugging, NOT FOR PRODUCTION USE // Did you read that? NOT FOR PRODUCTION USE! setvbuf(fp, NULL, _IOLBF, 0); /* line buffered */ keylog_fp = fp; } /* cleanup function to close the keylog file at exit */ static void keylog_cleanup(void) { // not sure if this is needed at all // we make sure that keylog_init_once has been called at least once pthread_once(&keylog_once, keylog_init_once); // if the file is open, close it, but do it safely without interrupting any write in progress pthread_mutex_lock(&keylog_mutex); if (keylog_fp) { fclose(keylog_fp); keylog_fp = NULL; } pthread_mutex_unlock(&keylog_mutex); } /* As we need to call the real SSL functions, we need to resolve their symbols using dlsym This is done to avoid ABI skew. And what is ABI skew? It is a mismatch between the library we use to compile the program and the library we use to run the program. It is a bit complex... and the explanation is: (a) Beyond the scope of this comment (b) I don't fully understand it myself Feel free to chose the option(s) that you like the most. */ // First we define these types that say something like: // "p_SSL_CTX_new is a pointer to a function that takes a SSL_METHOD and returns a SSL_CTX" // (and similar for the other functions we need to intercept) typedef SSL_CTX *(*p_SSL_CTX_new)(const SSL_METHOD *); typedef SSL_CTX *(*p_SSL_CTX_new_ex)(OSSL_LIB_CTX *, const char *, const SSL_METHOD *); typedef void (*p_SSL_CTX_set_keylog_callback)(SSL_CTX *, SSL_CTX_keylog_cb_func); typedef SSL_CTX_keylog_cb_func (*p_SSL_CTX_get_keylog_callback)(const SSL_CTX *); // Now we define some static variables to hold the real function pointers static p_SSL_CTX_new real_SSL_CTX_new; static p_SSL_CTX_new_ex real_SSL_CTX_new_ex; static p_SSL_CTX_set_keylog_callback real_set_klog; static p_SSL_CTX_get_keylog_callback real_get_klog; // Real men only resolve symbols once static pthread_once_t resolve_once = PTHREAD_ONCE_INIT; // Fun fact: once is a false friend in Spanish. It means eleven, not once. // Function to resolve the real symbols using dlsym // What does dlsym do? it looks up the address of a symbol (function or variable) in a // shared library // But which shared library? In theory, we call dlsym with a handle to the specific library // but this means that we need to know which library we are using and open it using dlopen. // Instead of doing this, we can use a special handler that tells dlsym to search for the // symbol using the default search order. This handler is RTLD_DEFAULT. // But the problem with RTLD_DEFAULT is that we will preload the shim library with the // symbols we want to intercept... and that sound pretty much like an infinite loop. // Luckily, there is another special handler, RTLD_NEXT, that tells dlsym to search // for the symbol in the next library after the current one. // Fun fact: 1 Infinite Loop used to be the address of the Apple headquarters in Cupertino static void resolve_syms(void) { real_SSL_CTX_new = (p_SSL_CTX_new) dlsym(RTLD_NEXT, "SSL_CTX_new"); real_SSL_CTX_new_ex = (p_SSL_CTX_new_ex) dlsym(RTLD_NEXT, "SSL_CTX_new_ex"); /* may be NULL on <3.0 */ real_set_klog = (p_SSL_CTX_set_keylog_callback)dlsym(RTLD_NEXT, "SSL_CTX_set_keylog_callback"); real_get_klog = (p_SSL_CTX_get_keylog_callback)dlsym(RTLD_NEXT, "SSL_CTX_get_keylog_callback"); } // Now a bit of explanation about SSL_CTX_new and SSL_CTX_new_ex // These functions create a ssl context (SSL_CTX) that holds configuration // and state information for SSL/TLS connections. // SSL_CTX_new is the older function available, while SSL_CTX_new_ex is newer (3.0+) // I guess calling it SSL_CTX__new_new would have been too much // And SSL_CTX_set_keylog_callback is a function that sets a callback function // that will be called whenever a new TLS session key is generated. // While SSL_CTX_get_keylog_callback returns the currently set callback function. // We will use get to check if there is already a callback installed and not // overwrite it if there is one. We are so polite. /* The callback function itself */ // Once we install the callback, this function will be called every time a new TLS session // key is generated. static void keylog_cb(const SSL *ssl, const char *line) { (void)ssl; // Avoid unused parameter warning if (!line || !*line) return; // if line is NULL or empty, do nothing // We make sure that keylog_init_once has been called at least once pthread_once(&keylog_once, keylog_init_once); // if the file is not open, do nothing if (!keylog_fp) return; // We write and flush the line to the file, but do it safely without interrupting any write in progress pthread_mutex_lock(&keylog_mutex); fputs(line, keylog_fp); fputc('n', keylog_fp); fflush(keylog_fp); pthread_mutex_unlock(&keylog_mutex); } /* We have a callback function, but it needs to be installed */ static inline void maybe_install_cb(SSL_CTX *ctx) { // If we don't have a ssl context, we can't do anything if (!ctx) return; // We make sure the symbols are resolved, but only once pthread_once(&resolve_once, resolve_syms); // If we have the real functions, and there is no callback installed yet, install ours // We only install the callback if there is no callback installed yet if (real_get_klog && real_set_klog && !real_get_klog(ctx)) { // install our callback real_set_klog(ctx, keylog_cb); } // This code will be executed only once (or twice... but who cares) // once is by default initialized to 0 and not 0 is 1 or true // but we are post incrementing it, so the first time it is not 0 (AKA true) // but the following times it is not (1 or greater than 1),(AKA false) // atexit registers a function to be called at program termination static int once; if (!once++) atexit(keylog_cleanup); } /* This function, as we explained before is the ssl context creator.*/ // We intercept this function to install our callback, we don't do anything else SSL_CTX *SSL_CTX_new(const SSL_METHOD *meth) { // We make sure the symbols are resolved, but only once pthread_once(&resolve_once, resolve_syms); // If we don't have the real function, we can't do anything if (!real_SSL_CTX_new) return NULL; // Call the real function to create the ssl context SSL_CTX *ctx = real_SSL_CTX_new(meth); // install our callback if needed maybe_install_cb(ctx); // We return the context as the original function does // Keep moving, nothing to see here! return ctx; } SSL_CTX *SSL_CTX_new_ex(OSSL_LIB_CTX *libctx, const char *propq, const SSL_METHOD *meth) { // I guess you know what this does by now pthread_once(&resolve_once, resolve_syms); // We're so polite that if we don't have the real function, we just fallback to // SSL_CTX_new if (real_SSL_CTX_new_ex) { // If I bothered to count the lines, why don't you bother to read my comments? // You just have to scroll up 20 lines! SSL_CTX *ctx = real_SSL_CTX_new_ex(libctx, propq, meth); // Guess what? The comment you are looking for is also 20 lines up! maybe_install_cb(ctx); // (Almost) nothing to see here, move along! return ctx; } // Read the comment 14 lines up return SSL_CTX_new(meth); /* fallback for OpenSSL <3.0 */ } |
And yes, you don’t have to type it; you can download it from my GitHub repository: https://github.com/peppla/ws-shim/
Compiling the shim shared library
So we have the code, now we need to compile it, but before that, we need to install some packages. On a Red Hat-based system, we need at least:
|
1 2 |
sudo dnf install gcc openssl-devel sudo dnf install wireshark |
Now we can compile the code:
|
1 |
gcc -fPIC -shared -o libsslkeylog.so shim.c -ldl -pthread |
And here it is, our shared library is ready to be used.
Let’s capture some traffic and decrypt it using Wireshark
We need to open two terminal sessions. In the first one, we will run Wireshark to capture the traffic, and in the other, we will run our application with the shim library preloaded. In this case, we will use the PostgreSQL client to connect to a PostgreSQL server running on the same host.
Terminal 1: Running Wireshark
We will use tshark, the command-line version of Wireshark, to capture the traffic. As I’m running the test locally, I will capture the traffic on the loopback interface.
|
1 |
>sudo tshark -i lo -f "tcp port 5432 and host 127.0.0.1" -w postgres_capture.pcap |
If you want to capture the traffic between two different hosts, you need to change the filter to something like:
|
1 |
>tcp port 5432 and host and host |
For MySQL, change the port to 3306. I did not test MongoDB or other databases, but as long as they use dynamically linked OpenSSL libraries, it should work. And do not forget to change the interface.
Once Wireshark is running, we can move to the second terminal.
Terminal 2: Running the PostgreSQL client with the shim library
To use the library, we need to set two environment variables:
|
1 2 |
>export LD_PRELOAD=$HOME/libsslkeylog.so export SSLKEYLOGFILE=$HOME/sslkeys.log |
The first one tells the dynamic linker to load our library before any other library. The second one tells our library where to write the TLS keys. Replace $HOME with the correct path of the library and the directory where you want to save your keys. Now, we run the PostgreSQL client. In my case, I created a database user named test with the supersecret password test. I’m so lazy that I did not create a database, so I will connect to the default PostgreSQL database.
|
1 |
psql "postgresql://test:[email protected]:5432/postgres?sslmode=require" -c "SELECT 'Hello, Wireshark!';" |
Now we check that the keys were dumped:
|
1 |
cat $HOME/sslkeys.log |
The output should look like this:
|
1 2 3 4 |
SERVER_HANDSHAKE_TRAFFIC_SECRET f7b6cb12d1bda... EXPORTER_SECRET f7b6cb12d1bda... SERVER_TRAFFIC_SECRET_0 f7b6cb12d1bda... CLIENT_HANDSHAKE_TRAFFIC_SECRET f7b6cb12d1bda... |
This means that the keys were dumped successfully, and we can use them to decrypt the traffic captured by Wireshark.
Terminal 1: Stop Wireshark
Now we can stop tshark by pressing Ctrl+C. The capture file postgres_capture.pcap should be created in the current directory. As we executed the capture as root, we may need to change the ownership of the file and move it to another location.
Analyzing the captured traffic
We will use tshark to analyze the captured traffic. You can also use the Wireshark GUI if you prefer. First, let’s validate that we can decrypt the traffic using the keys we dumped previously. As a security measure, I transferred the pcap file to a different and super-safe directory that I will not disclose here.
|
1 |
tshark -r /tmp/postgres_capture.pcap -o "tls.keylog_file:$PWD/sslkeys.log" -Y "pgsql" -T fields -e pgsql.val.data -e pgsql.query | grep -v -e "^"$'t'"$" |
What this command does is:
- Read the pcap file -r
- Add the option to use the keylog file -o
- We filter only the packets that contain PostgreSQL traffic with -Y
- With -T fields, we tell tshark to output only the specified fields
- With -,e we specify the fields we want to see, in this case, the data and the query
- Finally, we use grep to filter out empty lines
The results should look like this:
|
1 2 |
SELECT 'Hello, Wireshark!'; 48656c6c6f2c2057697265736861726b5c21 |
The first line is the query we executed, and the second one is the results. To decode the hex output, you just need to run:
|
1 |
echo "48656c6c6f2c2057697265736861726b5c21" | xxd -r -p ; echo |
Now that we know that the traffic is properly decrypted with the keys we have, we can analyze the traffic in more detail using:
|
1 |
tshark -r /tmp/postgres_capture.pcap -o "tls.keylog_file:$PWD/sslkeys.log" -Y "pgsql" -V -O pgsql |
For those who want to analyze MySQL traffic, the commands are similar, just change the port and the filters:
|
1 |
tshark -r /tmp/mysql_capture.pcap -o "tls.keylog_file:$PWD/sslkeys.log" -Y "mysql" -V -O mysql |
Analyzing the traffic using Wireshark GUI
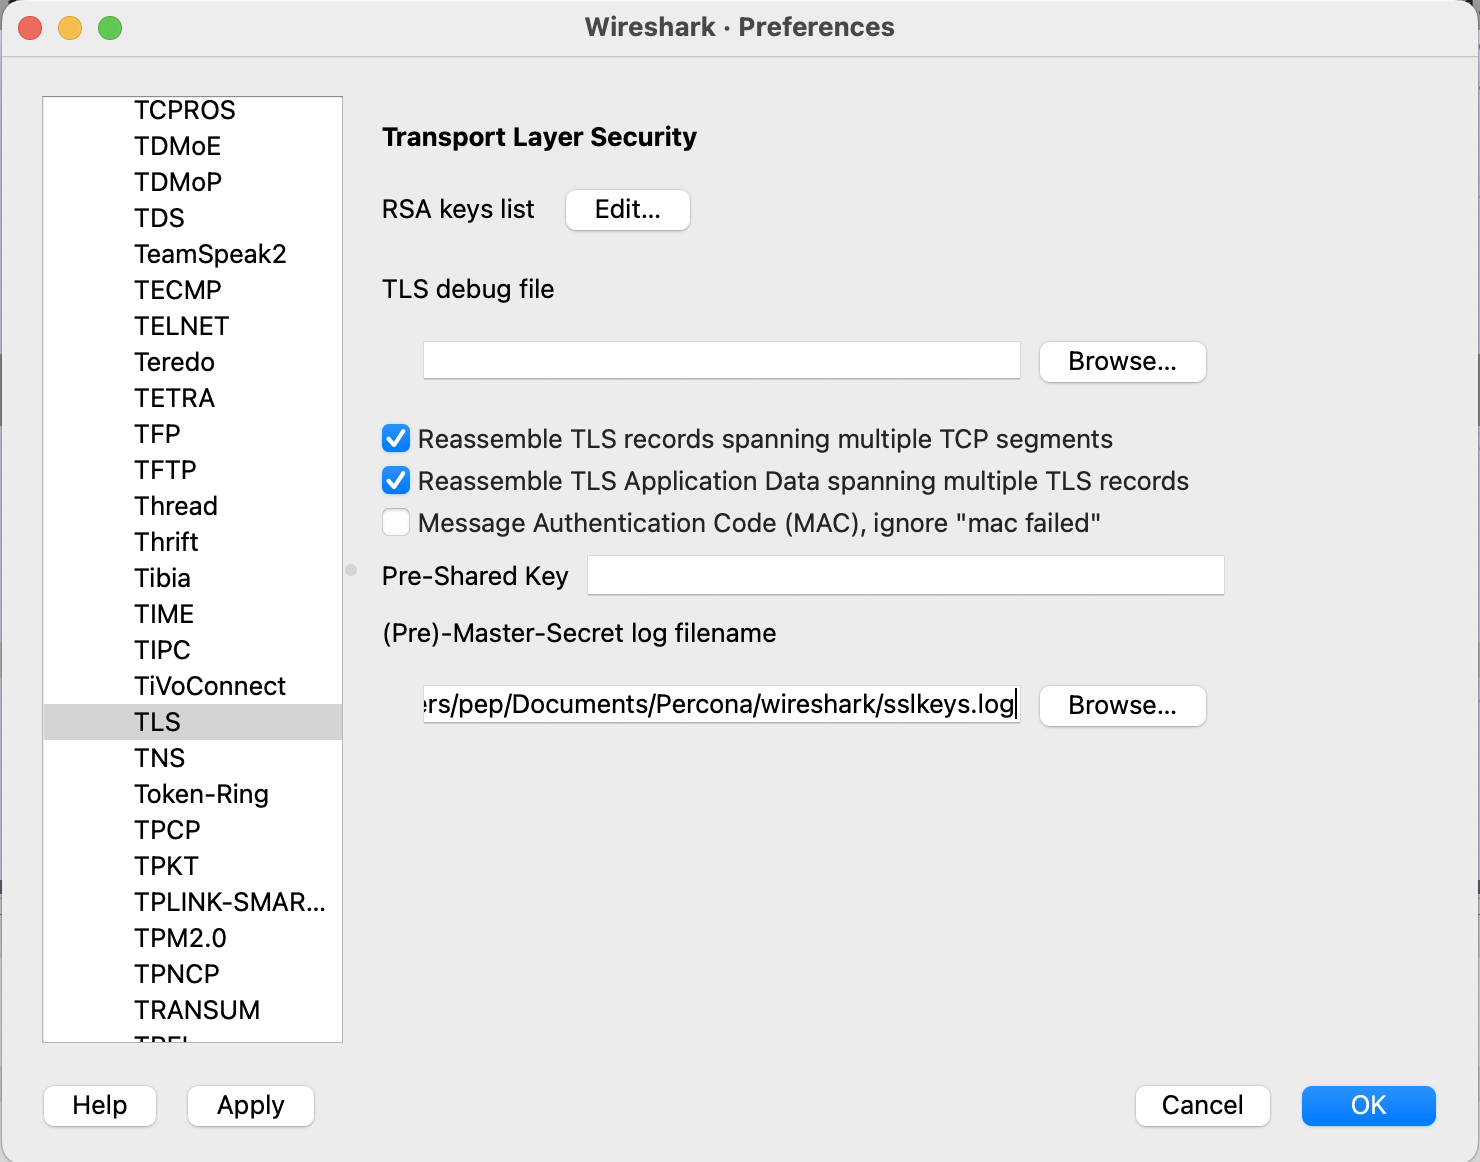
If you prefer to use the Wireshark GUI, just open Wireshark and go to Preferences -> Protocols -> TLS. In the (Pre)-Master-Secret log filename field, enter the path to your keylog file (e.g., /home/pep/sslkeys.log). Click OK to save the settings. Then you can open the pcap file, and you should be able to see the decrypted traffic.
And as it is not a blog post without a picture, here is a screenshot of the Wireshark GUI showing the configuration you have to do to load the keylog file.
Happy decrypting!
About the Author
 Pep Pla
Pep has been working with databases all his life. Born in a small village by the Mediterranean, he currently lives in Barcelona. He loves tech, traveling, good food, music and, all things NASA. He hates talking about himself in the third person and has a particular sense of humor. Happily married, he is the father of three boys and three cats.