

Running and managing MongoDB clusters in Kubernetes is made easy with the Percona Operator for MongoDB. Some aspects are just easy to grasp as they are well defined in the operator custom resources and documentation, but some are often considered to be a hidden craft. Network exposure in cases of sharded clusters is quite straightforward, whereas a single replica set or combinations with cloud native tools, like Istio, can be quite complicated.
In this series of blog posts, we will explore it in depth and review various strategies for connecting to your MongoDB cluster from anywhere.
There are two parts:
- Mastering Percona Server for MongoDB exposure in Kubernetes – Part 1 (this one) – covers single replica set exposure and explains split horizons concept
- Mastering Percona Server for MongoDB exposure in Kubernetes – Part 2 – Istio – is focused on network exposure with Istio – a cloud native service mesh.
Prerequisites
- Kubernetes cluster. We will use Google Kubernetes Engine, but any other would do as well. In some examples we will use a Load Balancer, which should be supported by the cluster of your choice.
- Percona Operator for MongoDB deployed. Follow our quick start installation guide.
- We will use various examples and manifests throughout this blog post. We store them in the blog-data/mongo-k8s-expose-rs git repository.
Basics
Our Operators rely on basic Kubernetes resources to expose database clusters and their components. These are Service resources and they can be of various types — ClusterIP, LoadBalancer, NodePort, and some custom variations. Read more about these resources in the official Kubernetes documentation. Operators automate the creation and configuration of these resources, attach them to necessary Pods, and maintain the configuration in the desired state.
As we are talking about MongoDB replica sets, we will modify replsets.[].expose section to expose the cluster. We explain the basics in our documentation.
No external exposure
There are valid use cases when you don’t need to expose your database outside of the Kubernetes cluster. It is a common practice to have an application and the MongoDB cluster running in the same k8s. In such cases exposure is not required; to connect manually to a database you can use port-forwarding or temporary (jump) Pods.

Use 00-rs-expose-demo.yaml to deploy the replica set with ClusterIPs.
|
1 |
kubectl apply -f https://raw.githubusercontent.com/spron-in/blog-data/master/mongo-k8s-expose-rs/00-rs-expose-demo.yaml |
Note the expose section:
|
1 2 3 4 5 6 |
replsets: - name: rs0 ... expose: enabled: true exposeType: ClusterIP |
It instructs the Operator to expose each replica set node through a Service resource of a ClusterIP type. ClusterIP provides an internal service that is reachable only within a Kubernetes cluster. To connect to it, the application must run in the same cluster.
The connection URI would have a list of comma-separated nodes with their internal domain names.
|
1 |
mongodb://databaseAdmin:PASSWORD@rs-expose-demo-rs0-0.rs-expose-demo-rs0.default.svc.cluster.local:27017,rs-expose-demo-rs0-1.rs-expose-demo-rs0.default.svc.cluster.local:27017,rs-expose-demo-rs0-2.rs-expose-demo-rs0.default.svc.cluster.local:27017/admin?replicaSet=rs0 |
There are three nodes and three ClusterIP services – here they are for better readability:
|
1 2 3 |
rs-expose-demo-rs0-0.rs-expose-demo-rs0.default.svc.cluster.local rs-expose-demo-rs0-1.rs-expose-demo-rs0.default.svc.cluster.local rs-expose-demo-rs0-2.rs-expose-demo-rs0.default.svc.cluster.local |
You can get them by either running kubectl get psmdb or kubectl get services.
Introducing split horizons
Let’s say we want to expose the cluster with a load balancer to allow connections from outside of Kubernetes. We change the expose section to use LoadBalancer Service type:
|
1 2 3 4 5 6 |
replsets: - name: rs0 ... expose: enabled: true exposeType: LoadBalancer |
Use 01-rs-expose-demo-lb.yaml to deploy the replica set with ClusterIPs.
|
1 |
kubectl apply -f https://raw.githubusercontent.com/spron-in/blog-data/master/mongo-k8s-expose-rs/01-rs-expose-demo-lb.yaml |
It should be possible to connect to the replica set using the external IP addresses of load balancers. But it will fail with the following error:
|
1 2 3 4 |
mongosh 'mongodb://databaseAdmin:[email protected]:27017,35.XXX.XXX.80:27017,35.XXX.XXX.209:27017/admin?replicaSet=rs0' Current Mongosh Log ID: 664f02bcdc62cf1f99b3470d Connecting to: mongodb://<credentials>@34.XXX.XXX.174:27017,35.XXX.XXX.80:27017,35.XXX.XXX.209:27017/admin?replicaSet=rs0&appName=mongosh+2.2.3 MongoNetworkError: getaddrinfo ENOTFOUND rs-expose-demo-rs0-0.rs-expose-demo-rs0.default.svc.cluster.local |
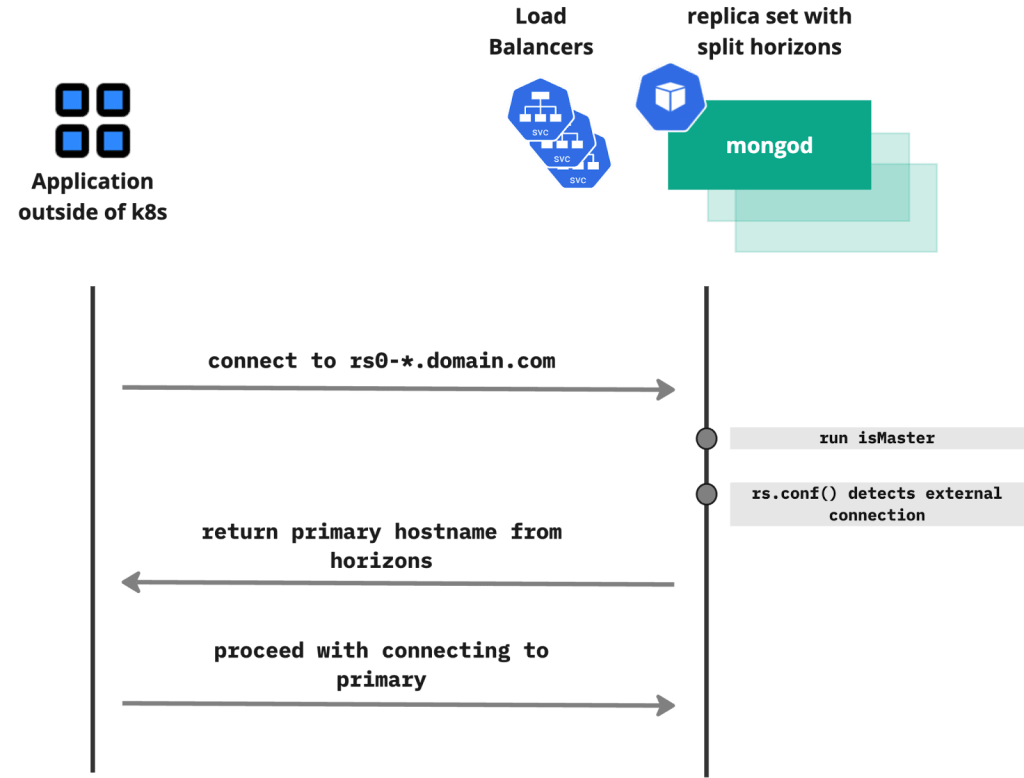
When connecting to a replica set, the host:port pairs in the connection string are a seedlist. The driver/client will attempt to connect to each host in the seedlist in turn until it gets a connection. It runs the isMaster command to determine which node is primary, and to get a list of all replica set members. Then it drops the original seedlist connection and attempts to connect to each replica set member using the host and port information retrieved. The host information returned by the isMaster usually matches the entry in rs.conf(), which are the hostnames used to initiate the replica set.
If you try to connect to the replica set through internal Kubernetes domain names (as in the “no exposure” section) and run rs.conf(), you will see the following:
|
1 2 3 4 5 6 7 8 9 10 11 12 13 14 15 16 17 18 19 |
{ ... members: [ { _id: 0, host: 'rs-expose-demo-rs0-0.rs-expose-demo-rs0.default.svc.cluster.local:27017', ... }, { _id: 1, host: 'rs-expose-demo-rs0-1.rs-expose-demo-rs0.default.svc.cluster.local:27017', ... }, { _id: 2, host: 'rs-expose-demo-rs0-2.rs-expose-demo-rs0.default.svc.cluster.local:27017', ... } ], |
So MongoDB returned the hosts with internal domain names, but outside of Kubernetes, these hostnames can’t be resolved. We need to somehow return externally resolvable hostnames to requests that come outside of Kubernetes. This is where Split Horizons come into play.
Split Horizons is a concept that is known from the Domain Name System (DNS). In the MongoDB world, it adds horizons configuration variables into a replica set, allowing rs.conf to return different hostnames for external requests.
To make it work, we need two things:
- Configure split horizons in the custom resource manifest
- Configure TLS – as split horizons do not work without TLS
Configure split horizons
Split horizons are well described in our documentation. All you have to do is to add replsets.[].splitHorizons section for your replica set. You must have one entry per each node. So if you have three nodes in your replica set, there must be not less than three entries under splitHorizons section. You can add more if you plan to scale.
Check out 02-rs-expose-demo-lb-split.yaml, I added my personal domain configuration there:
|
1 2 3 4 5 6 7 |
splitHorizons: rs-expose-demo-rs0-0: external: rs0-0.spron.in rs-expose-demo-rs0-1: external: rs0-1.spron.in rs-expose-demo-rs0-2: external: rs0-2.spron.in |
MongoDB does not allow the use of IP addresses for horizons, so it must be domains. Change this section and use your domain, then apply:
|
1 |
kubectl apply -f https://raw.githubusercontent.com/spron-in/blog-data/master/mongo-k8s-expose-rs/02-rs-expose-demo-lb-split.yaml |
Make sure that your domain names (in my case rs0-*.spron.in) point to the IP address of the load balancers. You should create proper A-records in your DNS. Adding temporary entries into /etc/hosts file will work only for local Kubernetes clusters (like minikube).
Configure TLS
As mentioned above, split horizons require TLS. If you use your own certificates already, just make sure that the domains in splitHorizons section are included into your server certificate in the Subject Alternative Name (SAN) section. You can see an example of how to generate certificates in our documentation. You can also use the script from the repository: generate-tls.sh.
With these certificates, you can connect to the replica set. My command looked the following way:
|
1 |
mongosh 'mongodb://databaseAdmin:[email protected]:27017,rs0-1.spron.in:27017,rs0-2.spron.in:27017/admin?authSource=admin&replicaSet=rs0' --tls --tlsCAFile ca.pem --tlsCertificateKeyFile server-cert.pem |
My script automatically generates ca.pem and server-cert.pem – it is a combination of server PEM certificate and key.
NodePort
Configuring exposure through NodePort and split horizons has two steps:
- Expose
- Configure the split horizons
You need to expose it first so that Kubernetes assigns the ports. Only after that, you can configure split horizons, as you will need to set the ports there as well.
Expose
This is just changing the service type to NodePort in the expose section:
|
1 2 3 4 5 6 |
replsets: - name: rs0 ... expose: enabled: true exposeType: NodePort |
Apply 03-rs-expose-demo-np.yaml manifest:
|
1 |
kubectl apply -f https://raw.githubusercontent.com/spron-in/blog-data/master/mongo-k8s-expose-rs/03-rs-expose-demo-np.yaml |
You will see NodePort service created and ports assigned:
|
1 2 3 4 5 6 |
% kubectl get svc ... rs-expose-demo-rs0-0 NodePort ... <none> 27017:31496/TCP 112m rs-expose-demo-rs0-1 NodePort ... <none> 27017:30178/TCP 111m rs-expose-demo-rs0-2 NodePort ... <none> 27017:30129/TCP 109m |
Update your DNS so that your replica set domains point to the Kubernetes node’s IP addresses.
Configure split horizons
Please note that splitHorizons support port setting starting from version 1.16 of the Operator. You can see more information in K8SPSMDB-1004.
With new A-records and port mappings, you should configure your split horizons. Here is an example from 04-rs-expose-demo-np-split.yaml:
|
1 2 3 4 5 6 7 |
splitHorizons: rs-expose-demo-rs0-0: external: rs0-0.spron.in:31496 rs-expose-demo-rs0-1: external: rs0-1.spron.in:30178 rs-expose-demo-rs0-2: external: rs0-2.spron.in:30129 |
Apply the manifest:
|
1 |
kubectl apply -f https://raw.githubusercontent.com/spron-in/blog-data/master/mongo-k8s-expose-rs/04-rs-expose-demo-np-split.yaml |
Now you can connect to the replica set using the split horizon host and port pairs:
|
1 |
mongosh 'mongodb://databaseAdmin:[email protected]:31496,rs0-1.spron.in:30178,rs0-2.spron.in:30129/admin?authSource=admin&replicaSet=rs0' --tls --tlsCAFile ca.pem --tlsCertificateKeyFile server-cert.pem |
Conclusion
We’ve explored how to effectively expose single MongoDB replica sets in Kubernetes using Percona Operator for MongoDB, both within the cluster and externally. We’ve discussed the concept of split horizons, a powerful technique for exposing replica sets through custom domains.
In the second part of this series, we dig into how to expose your MongoDB cluster using Istio, a popular service mesh that offers advanced traffic management and security features. Stay tuned!
MongoDB Performance Tuning is a collection of insights, strategies, and best practices from Percona’s MongoDB experts. Use it to diagnose — and correct — the issues that may be affecting your database’s performance.
About the Author
 Sergey Pronin
Sergey is a product leader at Percona focusing on delivering robust open-source database and cloud-native solutions. Prior to Percona Sergey led product management and engineering teams in other organizations with a primary focus on products in infrastructure and platforms space.


Just as a small modification, exposeType should be expose as per version 1.19
Great writeup though!