
Modern applications often rely on multiple services to provide fast, reliable, and scalable responses. A common and highly effective architecture involves an application, a persistent database (like MySQL), and a high-speed cache service (like Valkey).
In this guide, we’ll explore how to integrate these components effectively using Python to dramatically improve your application’s performance.
In our example, the setup looks like this:
|
1 2 3 4 5 |
Application(172.31.68.72) | |-- MySQL client --> Percona Server (172.31.67.228) | |-- Valkey client --> Valkey Server (172.31.22.118) |
The Application: The brain of the system. It decides when to query the database and when to rely on cached data.
Valkey: An in-memory key-value store optimized for extremely fast reads and writes.
MySQL: The durable storage layer. Queries here are slower but permanent.
The Mental Model: Application → Cache (Fast) → DB (Slow, Fallback). This approach reduces database load and dramatically improves response time.
Before diving into code, imagine the flow:
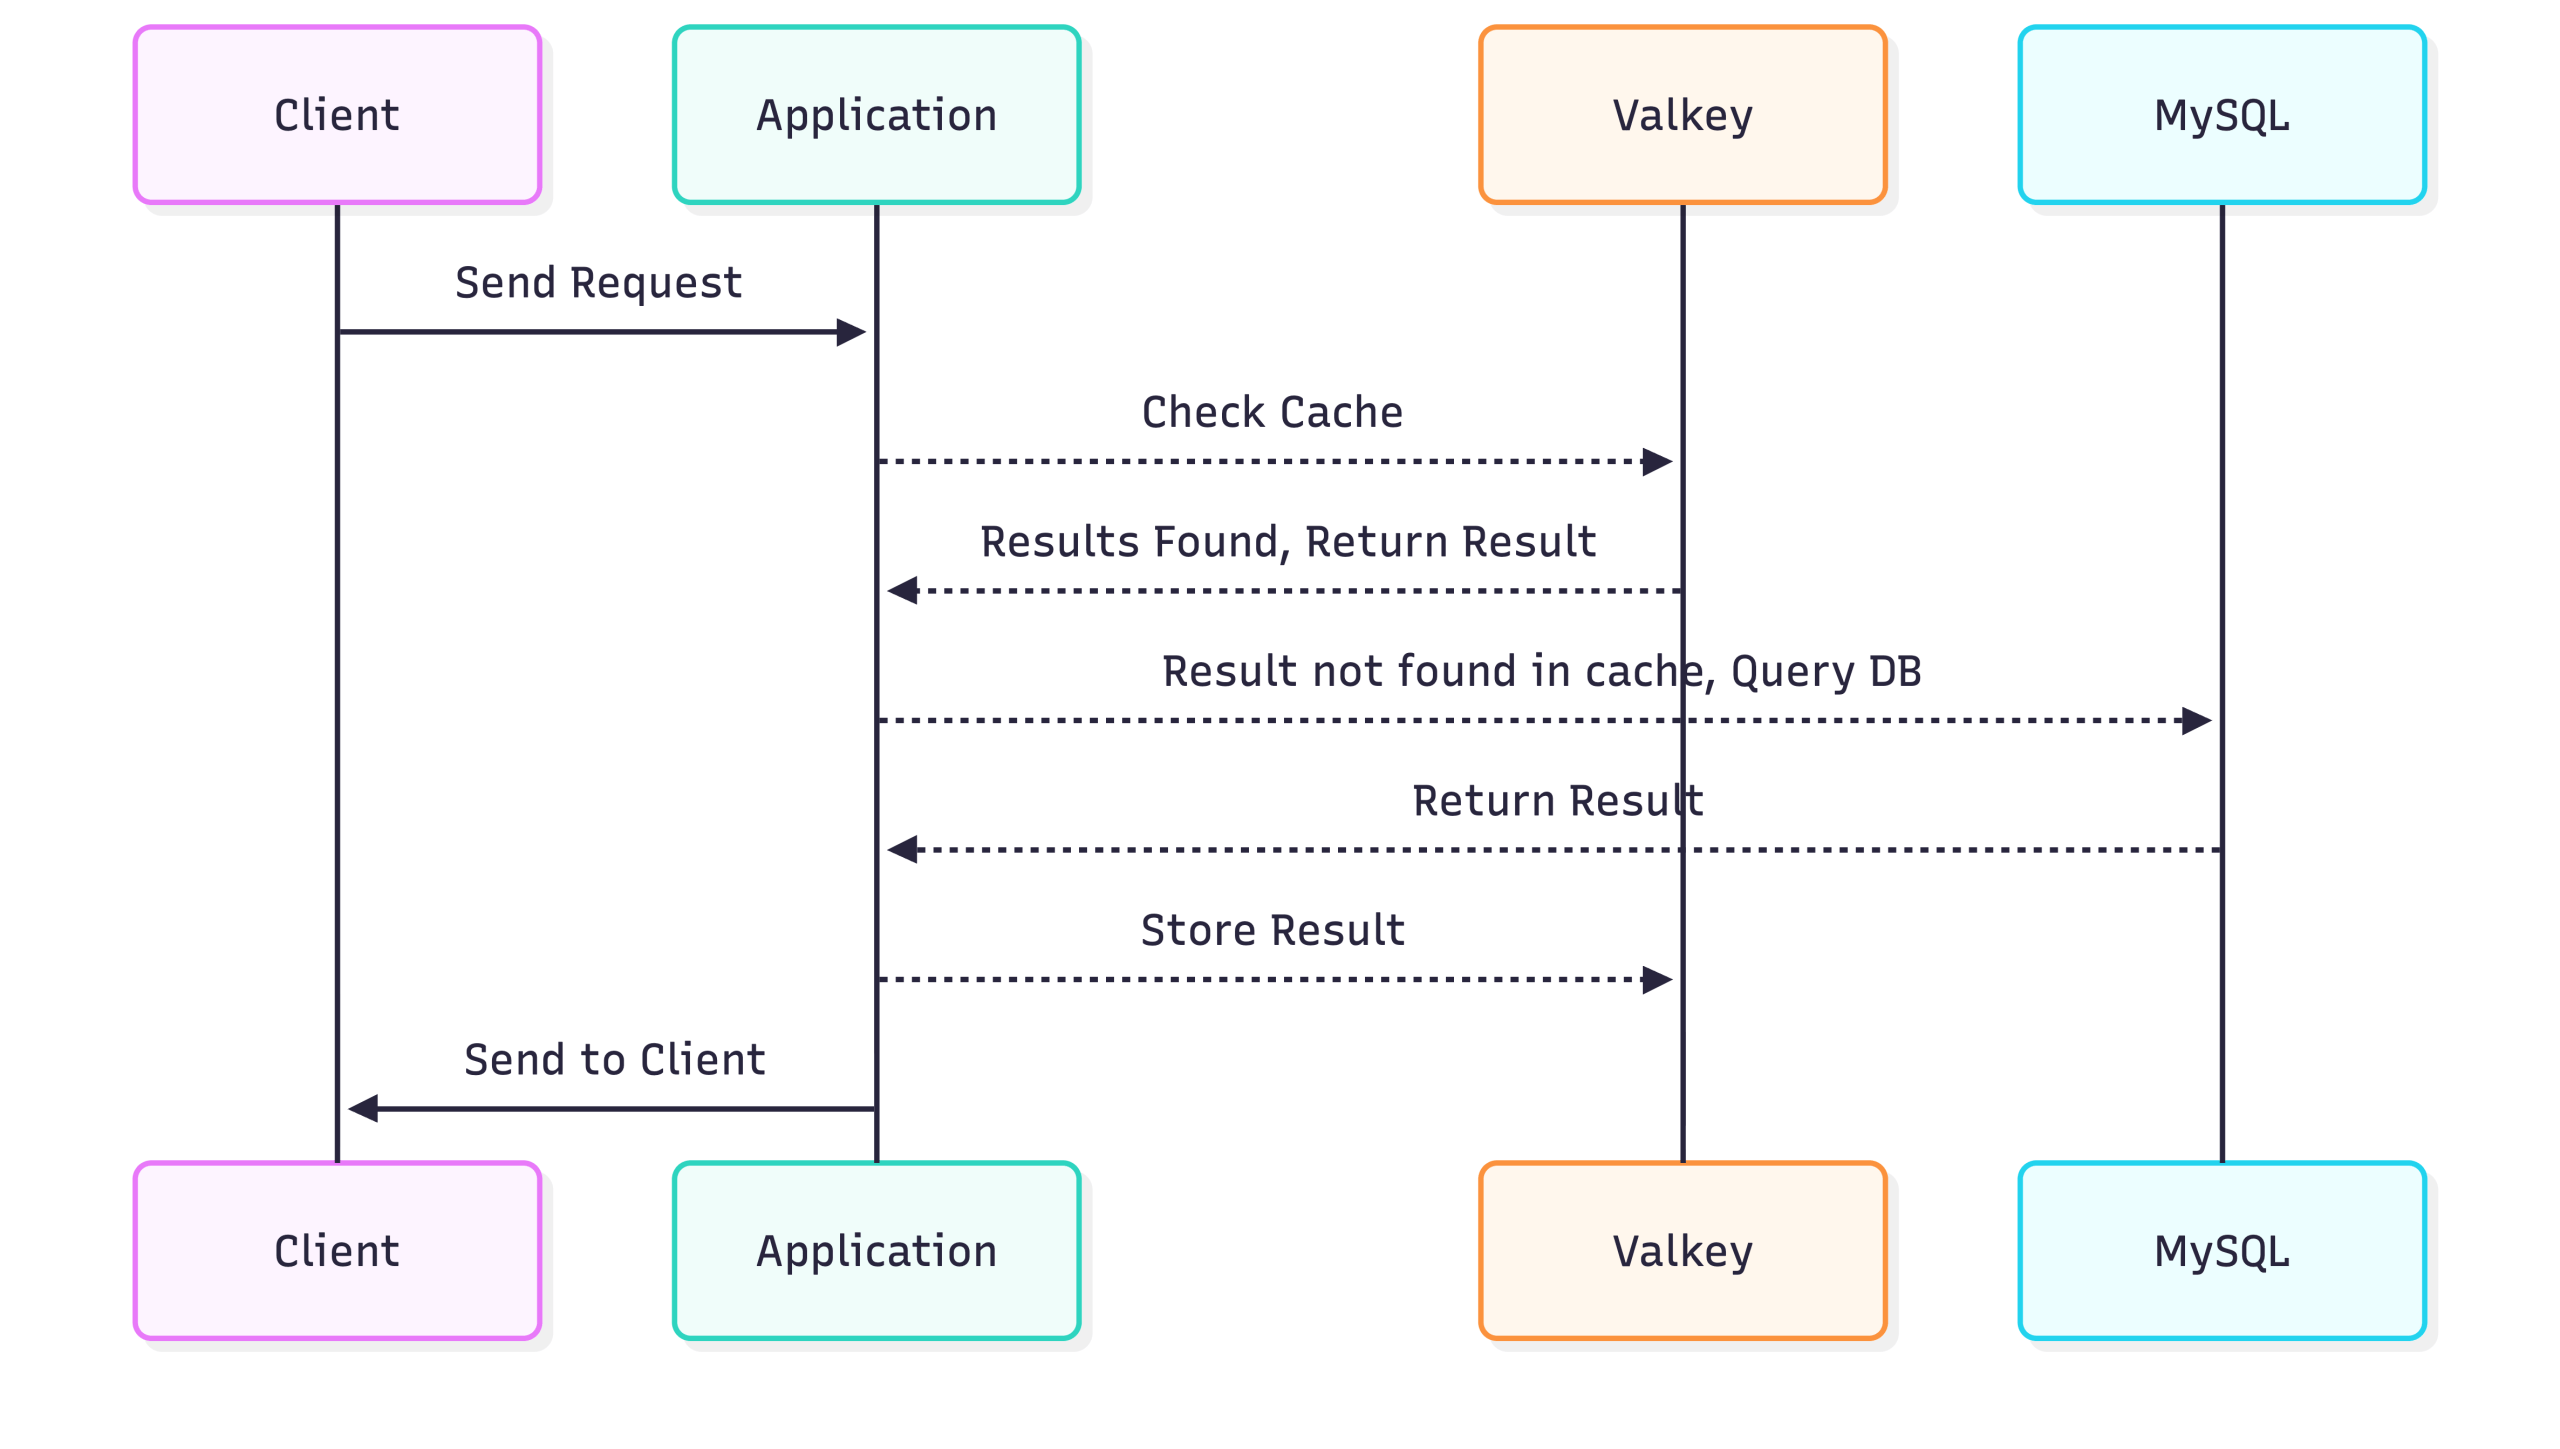
Key points:
This pattern is commonly called Cache-Aside or Lazy Loading.
Note on Client Library Selection: Valkey is fully Redis-compatible. In this demo, I am using the standard Python redis client to demonstrate portability and ease of migration—existing Redis-based applications can work with Valkey without code changes.
Alternatively, a native Valkey Python client library is also available for teams that prefer a Valkey-first ecosystem. Using the native library may provide closer alignment with Valkey-specific features and future enhancements.
⚠️ Demo Note: This example is intentionally simplified. It does not include production-grade features such as connection pooling, comprehensive error handling, or fallback strategies if Valkey is unavailable.
Fetching user information directly from the database for every request is inefficient. By introducing Valkey, we can cache these results to speed up subsequent requests.
First, we create a test database and a user table.
|
1 2 3 4 5 6 7 8 9 10 11 |
CREATE USER 'appuser'@'%' IDENTIFIED BY '***'; GRANT SELECT, INSERT, UPDATE, DELETE ON testdb.* TO 'appuser'@'%'; CREATE DATABASE testdb; USE testdb; CREATE TABLE users ( id INT PRIMARY KEY, name VARCHAR(100), email VARCHAR(100) ); SELECT * FROM users WHERE id = 101; |
On the Valkey server: Confirms that the valkey-cli can communicate with the valkey-server; the PONG response indicates the server is running and reachable.
|
1 2 3 |
ubuntu@ArunValkey:~$ valkey-cli ping PONG ubuntu@ArunValkey:~$ |
Shows that the valkey-server process is running under user valkey with PID 26075, listening on all interfaces (0.0.0.0) at port 6379.
|
1 2 |
ps -ef | grep valkey-server valkey 26075 1 0 17:57 ? 00:00:00 /usr/bin/valkey-server 0.0.0.0:6379 |
On the application (remote client):
Verifies that the Python client can successfully connect to the valkey server at 172.31.22.118:6379; r.ping() returning True confirms the server is reachable and responding.
|
1 2 3 |
(venv) root@App:/home/ubuntu# python3 -c "import redis; r=redis.Redis(host='172.31.22.118', port=6379); print(r.ping())" True (venv) root@App:/home/ubuntu# |
This snippet demonstrates a Python caching workflow using a virtual environment (venv). After activating the venv, the cache_test.py script establishes a connection to a MySQL database and a Valkey-based caching service. The get_user function first attempts to retrieve user data from the cache; if the data is missing (cache miss), it queries the database, then stores the result in the cache with a 5-minute expiration. The script includes test calls that fetch the same user three times, illustrating cache hits and misses, along with timing information to show the performance benefit of caching. Overall, it showcases an efficient pattern for reducing database load by leveraging a fast in-memory cache.
|
1 2 3 4 5 6 7 8 9 10 11 12 13 14 15 16 17 18 19 20 21 22 23 24 25 26 27 28 29 30 31 32 33 34 35 36 37 38 39 40 41 42 43 44 45 46 47 48 49 50 51 52 |
root@App:/home/ubuntu# source venv/bin/activate (venv) root@App:/home/ubuntu# cat cache_test.py import mysql.connector import redis import json import time # ---- MySQL connection ---- db = mysql.connector.connect( host="172.31.67.228", user="appuser", password="***", database="testdb" ) cursor = db.cursor(dictionary=True) # ---- Valkey connection ---- cache = redis.Redis( host="172.31.22.118", port=6379, decode_responses=True ) def get_user(user_id): key = f"user:{user_id}" # 1️⃣ Try cache cached_data = cache.get(key) if cached_data: print("✅ VALKEY HIT") return json.loads(cached_data) # 2️⃣ Cache miss → query DB print("❌ DB HIT") cursor.execute("SELECT * FROM users WHERE id = %s", (user_id,)) data = cursor.fetchone() # 3️⃣ Store in Valkey (5 minutes) cache.setex(key, 300, json.dumps(data)) return data # ---- Test calls ---- start = time.time() print(get_user(101)) print("Time:", time.time() - start) start = time.time() print(get_user(101)) print("Time:", time.time() - start) start = time.time() print(get_user(101)) print("Time:", time.time() - start) (venv) root@App:/home/ubuntu# |
In production systems, proper exception handling and resilience patterns should be implemented.
Running the script clearly shows the performance benefit. The first call fetches from the database, while subsequent calls hit the Valkey cache, making responses nearly instantaneous.
|
1 2 3 4 5 6 7 8 9 10 11 12 |
root@App:/home/ubuntu# source venv/bin/activate (venv) root@App:/home/ubuntu# python cache_test.py ❌ DB HIT Time: 0.00559544563293457 ✅ VALKEY HIT Time: 0.0006554126739501953 ✅ VALKEY HIT Time: 0.0008788108825683594 (venv) root@App:/home/ubuntu# |
Observation:
Caching frequently-accessed data in memory drastically reduces latency and database load, making your application faster and more scalable.
Time-To-Live (TTL) in Valkey is essentially a self-destruct timer for your data. When you set a key with a TTL (like the 300 seconds used in your cache.setex command), Valkey guarantees that the key will be automatically deleted from memory once that time elapses. This mechanism is critical for two reasons: it prevents your cache from filling up indefinitely with old data, and it ensures eventual consistency by forcing your application to re-fetch fresh data from the database after the timer expires.
The following script specifically demonstrates the “window of staleness” inherent in this strategy. When you updated the MySQL database directly in Step 2, the cache was unaware of the change and continued serving the old email address in Step 4 because the TTL hadn’t expired yet (a “Cache Hit”). It was only after the 5-minute timer ran out in Step 6 that the key was evicted, forcing a “Cache Miss” that finally pulled the updated email from the database. This illustrates that while TTL ensures data doesn’t stay stale forever, it does not guarantee immediate freshness.
|
1 2 3 4 5 6 7 8 9 10 11 12 13 14 15 16 17 18 19 20 21 22 23 24 25 26 27 28 29 30 31 32 33 34 35 36 |
root@App:/home/ubuntu# cat valkey_ttl_demo.sh #!/bin/bash source /home/ubuntu/venv/bin/activate echo "==================== STEP 1: Initial Run ====================" python3 ./cache_test.py echo echo "==================== STEP 2: Update MySQL ====================" echo "Updating testdb.users → setting email='[email protected]' where id=101 (Direct DB update, bypassing cache)" /usr/bin/mysql -h172.31.67.228 -e "UPDATE testdb.users WHERE id=101;" echo echo "==================== STEP 3: Monitor TTL (2 Minutes) ====================" for i in {1..2}; do echo "Checking TTL (minute $i)..." redis-cli -h 172.31.22.118 TTL user:101 sleep 60 done echo echo "==================== STEP 4: Run After 2 Minutes ====================" python3 ./cache_test.py echo echo "==================== STEP 5: Checking TTL after second run ====================" echo "Checking TTL after second run..." for i in {3..5}; do echo "Checking TTL (minute $i)..." redis-cli -h 172.31.22.118 TTL user:101 sleep 60 done echo echo "==================== STEP 6: Final Run ====================" python3 ./cache_test.py echo echo "==================== DEMO COMPLETE ====================" root@App:/home/ubuntu# |
|
1 2 3 4 5 6 7 8 9 10 11 12 13 14 15 16 17 18 19 20 21 22 23 24 25 26 27 28 29 30 31 32 33 34 35 36 37 38 39 40 41 42 43 44 45 46 47 48 49 50 51 52 |
root@App:/home/ubuntu# ./valkey_ttl_demo.sh ==================== STEP 1: Initial Run ==================== ❌ DB HIT Time: 0.0047206878662109375 ✅ VALKEY HIT Time: 0.0005364418029785156 ✅ VALKEY HIT Time: 0.0005519390106201172 ==================== STEP 2: Update MySQL ==================== Updating testdb.users → setting email='[email protected]' where id=101 (Direct DB update, bypassing cache) ==================== STEP 3: Monitor TTL (2 Minutes) ==================== Checking TTL (minute 1)... (integer) 300 Checking TTL (minute 2)... (integer) 240 ==================== STEP 4: Run After 2 Minutes ==================== ✅ VALKEY HIT Time: 0.0034325122833251953 ✅ VALKEY HIT Time: 0.0006437301635742188 ✅ VALKEY HIT Time: 0.0006194114685058594 ==================== STEP 5: Checking TTL after second run ==================== Checking TTL after second run... Checking TTL (minute 3)... (integer) 180 Checking TTL (minute 4)... (integer) 120 Checking TTL (minute 5)... (integer) 60 ==================== STEP 6: Final Run ==================== ❌ DB HIT Time: 0.00496220588684082 ✅ VALKEY HIT Time: 0.0009002685546875 ✅ VALKEY HIT Time: 0.0006501674652099609 ==================== DEMO COMPLETE ==================== root@App:/home/ubuntu# |
Best Practice: In production systems, any data modification should be immediately followed by cache invalidation or refresh of the affected keys. Relying solely on TTL provides eventual consistency but allows a window of stale data. To maintain data correctness, the application layer that modifies the database must also handle cache invalidation.
Valkey is also ideal for storing session information, where data needs fast retrieval and auto-expiry.
This Python script demonstrates session management using Valkey as a fast in-memory store. It creates a Valkey connection and defines login and get_session functions: login generates a unique session ID with uuid, stores user data (ID and role) in Valkey with a 1-hour expiration, and prints confirmation, while get_session retrieves the session, handling expired or missing sessions gracefully. The test flow shows creating a session, retrieving it immediately and after a short delay, and also demonstrates a quick-expiring test session to confirm automatic expiration, illustrating efficient and temporary session storage in a cache.
|
1 2 3 4 5 6 7 8 9 10 11 12 13 14 15 16 17 18 19 20 21 22 23 24 25 26 27 28 29 30 31 32 33 34 35 36 37 38 39 40 41 42 43 44 45 46 47 48 49 50 51 52 53 54 55 56 57 58 59 60 61 62 63 |
(venv) root@App:/home/ubuntu# cat session_test.py import redis import json import uuid import time # ---- Connect to Valkey (remote server) ---- cache = redis.Redis( host="172.31.22.118", port=6379, decode_responses=True ) # ---- Function to simulate login and create session ---- def login(user_id, role): session_id = str(uuid.uuid4()) session_key = f"session:{session_id}" session_data = { "user_id": user_id, "role": role } # Store in Valkey for 1 hour #Note: An alternative is ValkeyJSON, which enables native JSON storage and provides benefits such as #field-level updates, greater flexibility, and simplified data handling without manual serialization. cache.setex(session_key, 3600, json.dumps(session_data)) print(f"✅ Session created: {session_id}") return session_id # ---- Function to get session data ---- def get_session(session_id): session_key = f"session:{session_id}" data = cache.get(session_key) if not data: print("❌ Session expired or not found") return None print("✅ Session found:", json.loads(data)) return json.loads(data) # ---- Test the flow ---- if __name__ == "__main__": # Step 1: Create a session session_id = login(101, "admin") # Step 2: Read it immediately get_session(session_id) # Step 3: Simulate another read after 2 seconds time.sleep(2) get_session(session_id) # Step 4: Quick expiry demo print("n⏳ Testing short expiry...") cache.setex("session:test", 5, json.dumps({"user_id": 999})) print("Session 'test' set for 5 seconds") time.sleep(6) if cache.get("session:test") is None: print("✅ 'test' session expired as expected") else: print("❌ 'test' session still exists") (venv) root@App:/home/ubuntu# |
Sessions are fast to read/write, and expiry ensures memory is not wasted on stale data.
Session caching reduces database hits for authentication and user-specific data, improving both speed and scalability.
Observing Session Caching Results
Running the session caching script demonstrates how Valkey efficiently handles session storage and expiry:
|
1 2 3 4 5 6 7 8 9 |
(venv) root@App:/home/ubuntu# python3 session_test.py ✅ Session created: c4bd8341-698a-4ea2-82a3-95370cd3011a ✅ Session found: {'user_id': 101, 'role': 'admin'} ✅ Session found: {'user_id': 101, 'role': 'admin'} ⏳ Testing short expiry... Session 'test' set for 5 seconds ✅ 'test' session expired as expected (venv) root@App:/home/ubuntu# |
The output shows that sessions are quickly stored and retrieved from Valkey, and short-lived sessions expire automatically, preventing stale data accumulation. This highlights Valkey’s effectiveness for fast, temporary storage like authentication sessions.
Using Valkey as a caching layer significantly improves application performance by reducing direct database reads and accelerating response times. By implementing the Cache-Aside pattern, the application intelligently determines when to retrieve data from cache and when to fall back to MySQL, ensuring both performance and correctness. Session caching further demonstrates how short-lived, temporary data can be efficiently managed with automatic expiration (TTL), reducing unnecessary persistence overhead.
This architecture highlights a clear separation of responsibilities:
Discover more: A Practical Guide to Valkey: Configuration, Best Practices, and Production Tuning