
This article explains how to manually migrate hash slots in Valkey/Redis clusters to expand your deployment with minimal disruption to availability.
Note: Valkey 9.0 introduces the Atomic Slot Migration (ASM) feature, which significantly improves migration speed (up to 9.52 times faster) and reliability, while reducing migration complexity. So you should use ASM instead if you are using Valkey version 9.0 and later. You can read more about ASM in the Valkey’s community blog.
Valkey and Redis clusters partition their keyspace into 16,384 hash slots. Each key is assigned to a slot based on the CRC16 hash of its name (or hashtag), ensuring consistent and deterministic routing across cluster nodes:
|
1 |
CRC16(<key>) % 16384 |
So, for example, the command SET hello world will store the key hello in slot 866.
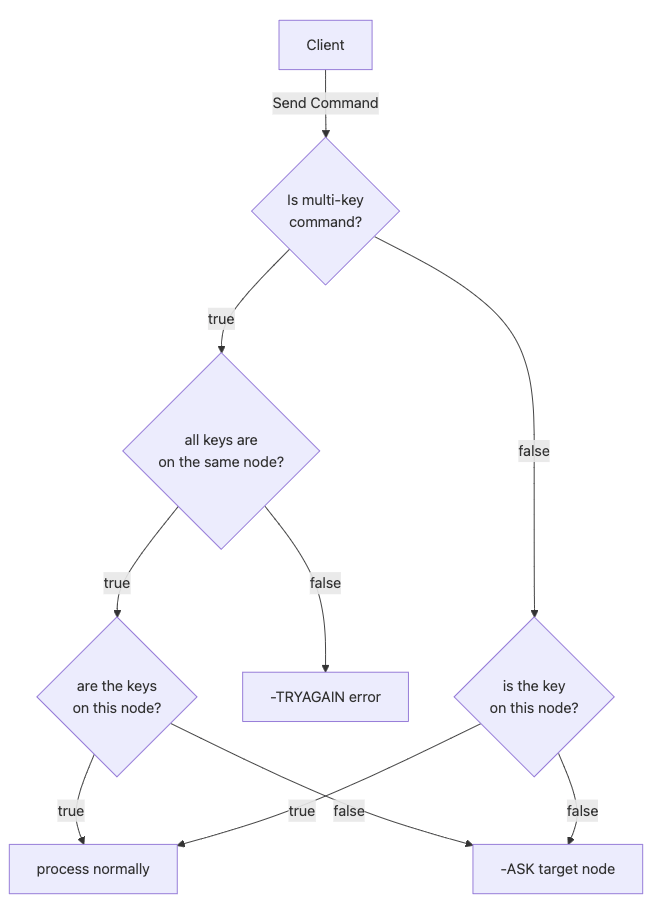
Because hash slots in Valkey/Redis can be located on different processes, if you access multiple slots in a single command, the cluster would have to coordinate between nodes. This can impact cluster performance and data consistency, as nodes can fail while processing a command. So, to keep things simple and fast, Valkey/Redis will disallow accessing keys that hash to different slots.
You can read more about distributing data in Valkey/Redis cluster in my colleague Agustin’s blog post.
As your dataset grows, your Valkey/Redis cluster may not have enough memory to hold all the data; or the resource utilization between nodes is not evenly distributed. To address these issues, you might need to add more nodes to the cluster, or move the hash slots around so that data doesn’t get evicted, and no nodes are under/overutilized.
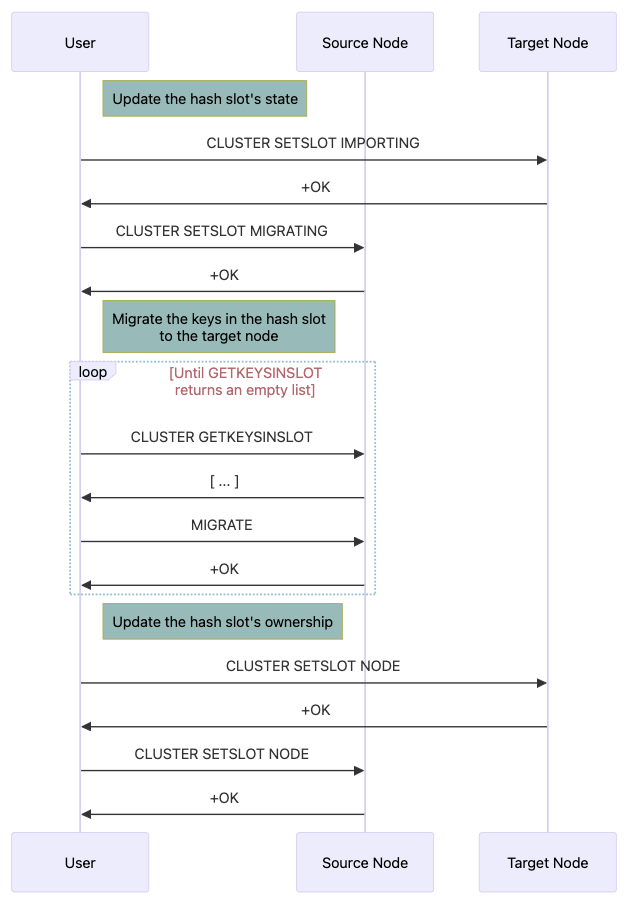
The slot migration process can be roughly divided into 3 steps:
1. Update the hash slot’s state so that clients can know where to get the keys during the migration stage:
|
1 2 |
CLUSTER SETSLOT <slot> IMPORTING <source ID> CLUSTER SETSLOT <slot> MIGRATING <target ID> |
2. MIGRATE the keys in the hash slot to the new owner:
|
1 2 |
CLUSTER GETKEYSINSLOT <slot> <number of keys to return> MIGRATE <target host> <target port> "" 0 5000 KEYS <key1> <key2> ... <keyN> |
3. Update the hash slot’s metadata to reflect the new ownership:
|
1 |
CLUSTER SETSLOT <slot> NODE <target ID> |
During hash slot migration, if a command accesses keys stored in the migrating slot, the instance will first check its local hash table. If the keys are not found locally, the client will receive an ASK redirection to the target node. Unlike MOVED (which also tells the client to retry requests at another node), an ASK redirection is meant to be temporary; it will not update the client’s slot cache and affects only a single request. So, when you re-run the same request, even if you are on the correct node, you will still get redirected:
|
1 2 3 4 5 6 7 8 |
127.0.0.1:30002> GET 123 -> Redirected to slot [5970] located at 127.0.0.1:30001 "123" 127.0.0.1:30001> GET 123 -> Redirected to slot [5970] located at 127.0.0.1:30002 -> Redirected to slot [5970] located at 127.0.0.1:30001 "123" |
Commands executed during migration may fail if they access keys that are distributed across different nodes. In this case, the command will encounter the same limitation as a CROSSSLOT error, because all keys involved in the operation must reside on the same instance:
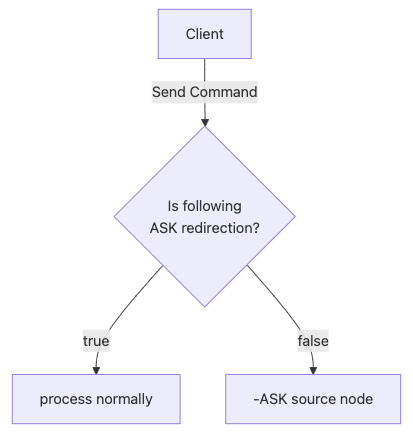
If the target node is the one receiving commands, the flow is much easier. It just checks if you are following an ASK redirection. If so, the command will be processed normally. If not, then the node will respond with -ASK and direct you to the original owner:
So, during the slot migration, your request will be redirected at most twice, first to the source node (since it is still registered as the owner of the hash slot), then to the target node if the keys are not found on the source:
|
1 2 3 4 5 6 |
# connect to the target node, and GET a non-existent key valkey-cli -c -p 30001 127.0.0.1:30001> GET {123}1 -> Redirected to slot [5970] located at 127.0.0.1:30002 -> Redirected to slot [5970] located at 127.0.0.1:30001 (nil) |
valkey-cli --cluster rebalance won’t work for all casesDepending on your application’s key pattern, the number of keys each slot holds can vary, and a slot might have a disproportionate number of keys (the hot-slot problem). And, the --cluster rebalance command only attempts to evenly distribute the number of slots each node has:
|
1 2 3 4 5 6 7 8 9 10 11 12 13 14 15 16 17 18 19 20 21 22 23 24 25 26 27 |
/* Calculate the slots balance for each node. It's the number of * slots the node should lose (if positive) or gain (if negative) * in order to be balanced. */ int threshold_reached = 0, total_balance = 0; float threshold = config.cluster_manager_command.threshold; i = 0; listRewind(involved, &li); while ((ln = listNext(&li)) != NULL) { clusterManagerNode *n = ln->value; weightedNodes[i++] = n; int expected = (int)(((float)CLUSTER_MANAGER_SLOTS / total_weight) * n->weight); n->balance = n->slots_count - expected; total_balance += n->balance; /* Compute the percentage of difference between the * expected number of slots and the real one, to see * if it's over the threshold specified by the user. */ int over_threshold = 0; if (threshold > 0) { if (n->slots_count > 0) { float err_perc = fabs((100 - (100.0 * expected / n->slots_count))); if (err_perc > threshold) over_threshold = 1; } else if (expected > 1) { over_threshold = 1; } } if (over_threshold) threshold_reached = 1; } |
So, using --cluster rebalance could migrate all hot slots to the same node, further exacerbating the issue.
To find the list of big hash slots, we can use CLUSTER SLOT-STATS, which provides details for each slot (number of keys, CPU time, and network I/O).
Note: to display stats other than key-count, the config cluster-slot-stats-enabled needs to be set. The config can be modified during runtime, but remember to set it for all nodes in the cluster:
|
1 2 3 4 5 6 7 8 9 10 11 12 13 14 15 |
127.0.0.1:30001> CONFIG SET cluster-slot-stats-enabled yes OK 127.0.0.1:30001> CLUSTER SLOT-STATS ORDERBY KEY-COUNT 1) 1) (integer) 12426 2) 1# "key-count" => (integer) 45 2# "cpu-usec" => (integer) 0 3# "network-bytes-in" => (integer) 0 4# "network-bytes-out" => (integer) 0 2) 1) (integer) 13902 2) 1# "key-count" => (integer) 20 2# "cpu-usec" => (integer) 0 3# "network-bytes-in" => (integer) 0 4# "network-bytes-out" => (integer) 0 3) ... |
To find which node the hash slot belongs to, we can use the CLUSTER SLOTS command. In the example below, node 127.0.0.1:30001 holds slots 0-5460, 127.0.0.1:30003 holds slots 10923-16383:
|
1 2 3 4 5 6 7 8 9 10 11 12 13 14 15 16 17 18 19 20 21 22 23 24 25 26 27 28 29 30 31 32 33 34 |
127.0.0.1:30001> CLUSTER SLOTS 1) 1) (integer) 0 2) (integer) 5460 3) 1) "127.0.0.1" 2) (integer) 30001 3) "09dbe9720cda62f7865eabc5fd8857c5d2678366" 4) 1) hostname 2) "host-1.valkey.example.com" 3) availability-zone 4) "zone-a" 4) 1) "127.0.0.1" 2) (integer) 30004 3) "821d8ca00d7ccf931ed3ffc7e3db0599d2271abf" 4) 1) hostname 2) "host-2.valkey.example.com" 3) availability-zone 4) "zone-a" 2) 1) (integer) 10923 2) (integer) 16383 3) 1) "127.0.0.1" 2) (integer) 30003 3) "044ec91f325b7595e76dbcb18cc688b6a5b434a1" 4) 1) hostname 2) "host-5.valkey.example.com" 3) availability-zone 4) "zone-a" 4) 1) "127.0.0.1" 2) (integer) 30006 3) "58e6e48d41228013e5d9c1c37c5060693925e97e" 4) 1) hostname 2) "host-6.valkey.example.com" 3) availability-zone 4) "zone-a" 3) ... |
To find the nodes’ IDs, use the CLUSTER NODES command. The ID of each node is shown in the first column:
|
1 2 3 4 5 6 7 |
127.0.0.1:30001> CLUSTER NODES b1bb71c7d39d2c061ce3fc010b444cc20cbfb7b8 127.0.0.1:30001@40001 myself,master - 0 0 1 connected 0-5460 b32b8042b9280c6a5d266fcaf68c90f5167f8463 127.0.0.1:30002@40002 master - 0 1777009844302 2 connected 5461-10922 a4fc0747229514c300777d219fa80f90a0e656a2 127.0.0.1:30003@40003 master - 0 1777009844000 3 connected 10923-16383 4eeb33e93843559c51ec57a676e4e9d6a7489d5d 127.0.0.1:30004@40004 slave b32b8042b9280c6a5d266fcaf68c90f5167f8463 0 1777009844097 2 connected f2acd5e5b73862c987b4c437919c4b1d3f7620c4 127.0.0.1:30005@40005 slave a4fc0747229514c300777d219fa80f90a0e656a2 0 1777009844202 3 connected 8889e25bc107d09d255c4f932c652e5d77ab1948 127.0.0.1:30006@40006 slave b1bb71c7d39d2c061ce3fc010b444cc20cbfb7b8 0 1777009843687 1 connected |
After collecting statistics for each hash slot, we should have a clear understanding of the data size and usage patterns for each slot. Based on this information, we can decide which underutilized node a slot should be migrated to. This helps ensure that resource utilization is evenly balanced across all nodes in the cluster.
On the target node, execute CLUSTER SETSLOT <SLOT> IMPORTING <SOURCE-NODE-ID>
|
1 2 |
valkey-cli -p 30001 -c CLUSTER SETSLOT 5970 IMPORTING b32b8042b9280c6a5d266fcaf68c90f5167f8463 OK |
On the source node, execute CLUSTER SETSLOT <SLOT> MIGRATING <TARGET-NODE-ID>
|
1 2 |
valkey-cli -p 30002 -c CLUSTER SETSLOT 5970 MIGRATING b1bb71c7d39d2c061ce3fc010b444cc20cbfb7b8 OK |
When set correctly, commands that create new keys in the hash slot will be directed to the target node:
|
1 2 3 |
127.0.0.1:30002> SET 123 hello -> Redirected to slot [5970] located at 127.0.0.1:30001 OK |
Note: remember to double-check the node IDs used in the commands. Currently, Valkey/Redis does not check if the node ID provided is the actual owner of the hash slot, so the (wrong) commands like below will still be able to execute successfully:
|
1 2 3 4 5 6 7 |
# set the hash slot 5970 as IMPORTING from myself valkey-cli -p 30001 -c CLUSTER SETSLOT 5970 IMPORTING "$(valkey-cli -p 30001 -c CLUSTER MYID)" OK # set the hash slot 5970 as MIGRATING to myself valkey-cli -p 30002 -c CLUSTER SETSLOT 5970 MIGRATING "$(valkey-cli -p 30002 -c CLUSTER MYID)" OK |
So, when a new key is created (or a migrated key is updated), the request still goes to the original owner, instead of the target node:
|
1 2 |
127.0.0.1:30002> SET 123 hello OK |
And if you attempt to migrate a duplicated key, you will get the following error:
|
1 2 |
127.0.0.1:30002> MIGRATE 127.0.0.1 30001 123 0 5000 (error) ERR Target instance replied with error: BUSYKEY Target key name already exists. |
Since valkey-cli --cluster check will still report the correct status, debugging this issue will be pretty confusing:
|
1 2 3 4 5 6 7 8 9 10 11 12 13 14 15 16 17 18 19 20 21 22 23 24 25 26 27 28 29 30 31 32 33 34 |
valkey-cli --cluster check 127.0.0.1:30001 127.0.0.1:30001 (ed38d440...) -> 1 keys | 5461 slots | 1 replicas. 127.0.0.1:30002 (654a8caa...) -> 1 keys | 5462 slots | 1 replicas. 127.0.0.1:30003 (e0ed692b...) -> 0 keys | 5461 slots | 1 replicas. [OK] 2 keys in 3 primaries. 0.00 keys per slot on average. >>> Performing Cluster Check (using node 127.0.0.1:30001) M: ed38d44008b75d1b04f9670672e117d5764da51c 127.0.0.1:30001 slots:[0-5460] (5461 slots) master 1 additional replica(s) S: 00fa8982389641fb2b73b416f08fafb18d9cc404 127.0.0.1:30006 slots: (0 slots) slave replicates e0ed692bdf8f203322077dfeefb4d72f3ae121d2 S: fa4c2f539e74c18fe3aba7e8cdae7a01b91dd782 127.0.0.1:30004 slots: (0 slots) slave replicates ed38d44008b75d1b04f9670672e117d5764da51c M: 654a8caa0b5f53cd02698cf46ef9a102d0277ead 127.0.0.1:30002 slots:[5461-10922] (5462 slots) master 1 additional replica(s) M: e0ed692bdf8f203322077dfeefb4d72f3ae121d2 127.0.0.1:30003 slots:[10923-16383] (5461 slots) master 1 additional replica(s) S: 2063030dab7cce9dcc248031f53e6224b7c727c3 127.0.0.1:30005 slots: (0 slots) slave replicates 654a8caa0b5f53cd02698cf46ef9a102d0277ead [OK] All nodes agree about slots configuration. >>> Check for open slots... [WARNING] Node 127.0.0.1:30001 has slots in importing state 5970. [WARNING] Node 127.0.0.1:30004 has slots in importing state 5970. [WARNING] Node 127.0.0.1:30002 has slots in migrating state 5970. [WARNING] Node 127.0.0.1:30005 has slots in migrating state 5970. [WARNING] The following slots are open: 5970. >>> Check slots coverage... [OK] All 16384 slots covered. |
I have created a Pull Request to the Valkey project, disallowing the command CLUSTER SETSLOT MIGRATING/IMPORTING to point to itself, so future versions of Valkey should not encounter this issue.
After updating the slots’ state, we need to perform the actual data migration in those slots. We need to get the list of keys in the migrating slot using CLUSTER GETKEYSINSLOT, then execute the MIGRATE command on the found keys.
The script below will get and migrate the keys in DB 0 in slot 5970 from node 127.0.0.1:30002 to 127.0.0.1:30001 in a batch of 10 keys, with the timeout for each MIGRATE command being 5000 milliseconds:
|
1 2 3 4 5 6 7 8 9 10 |
keys="$(valkey-cli -p 30002 -c CLUSTER GETKEYSINSLOT 5970 10)" while [[ "${keys}" != "" ]] do valkey-cli -p 30002 -c MIGRATE 127.0.0.1 30001 "" 0 5000 KEYS $keys keys="$(valkey-cli -p 30002 -c CLUSTER GETKEYSINSLOT 5970 10)" done OK OK OK ... |
The migration is finished when CLUSTER GETKEYSINSLOT returns an empty array:
|
1 2 |
valkey-cli -p 30002 -c CLUSTER GETKEYSINSLOT 5970 10 (empty array) |
After the keys migration is completed, update the slot’s metadata on the original and new node using CLUSTER SETSLOT <SLOT> NODE <TARGET-NODE-ID> to reflect the new ownership:
|
1 2 3 4 5 |
valkey-cli -p 30001 -c CLUSTER SETSLOT 5970 NODE b1bb71c7d39d2c061ce3fc010b444cc20cbfb7b8 OK valkey-cli -p 30002 -c CLUSTER SETSLOT 5970 NODE b1bb71c7d39d2c061ce3fc010b444cc20cbfb7b8 OK |
It will take a little while for the cluster to agree on the new slot distribution, as the metadata is propagated via the gossip protocol.
Validate the cluster’s hash slots distribution with valkey-cli –cluster check to ensure that all slots are covered:
|
1 2 3 4 5 6 7 8 9 10 11 12 13 14 15 16 17 18 19 20 21 22 23 24 25 26 27 28 29 |
valkey-cli --cluster check 127.0.0.1:30001 & 127.0.0.1:30001 (b1bb71c7...) -> 1000 keys | 5462 slots | 1 replicas. 127.0.0.1:30002 (b32b8042...) -> 0 keys | 5461 slots | 1 replicas. 127.0.0.1:30003 (a4fc0747...) -> 0 keys | 5461 slots | 1 replicas. [OK] 1000 keys in 3 primaries. 0.06 keys per slot on average. >>> Performing Cluster Check (using node 127.0.0.1:30001) M: b1bb71c7d39d2c061ce3fc010b444cc20cbfb7b8 127.0.0.1:30001 slots:[0-5460],[5970] (5462 slots) master 1 additional replica(s) M: b32b8042b9280c6a5d266fcaf68c90f5167f8463 127.0.0.1:30002 slots:[5461-6917],[6919-10922] (5461 slots) master 1 additional replica(s) M: a4fc0747229514c300777d219fa80f90a0e656a2 127.0.0.1:30003 slots:[10923-16383] (5461 slots) master 1 additional replica(s) S: 4eeb33e93843559c51ec57a676e4e9d6a7489d5d 127.0.0.1:30004 slots: (0 slots) slave replicates b32b8042b9280c6a5d266fcaf68c90f5167f8463 S: f2acd5e5b73862c987b4c437919c4b1d3f7620c4 127.0.0.1:30005 slots: (0 slots) slave replicates a4fc0747229514c300777d219fa80f90a0e656a2 S: 8889e25bc107d09d255c4f932c652e5d77ab1948 127.0.0.1:30006 slots: (0 slots) slave replicates b1bb71c7d39d2c061ce3fc010b444cc20cbfb7b8 [OK] All nodes agree about slots configuration. >>> Check for open slots... >>> Check slots coverage... [OK] All 16384 slots covered. |
We can see that the migration is successful, with all 16384 hash slots covered, and the slot distribution is reported correctly, with node 127.0.0.1:30001 having 1 more slot than the rest.
In this article, we learned how to perform manual hash slot migration to balance/expand a Valkey/Redis cluster. And while manual hash slot migration is a necessary process to resolve hot-slot issues that automated rebalancing cannot, users on Valkey 9.0 and later should leverage the faster, more reliable Atomic Slot Migration (ASM) feature.
Resources
RELATED POSTS