
I will be speaking at Percona Live 2023 about serverless PostgreSQL. Join us at this event if you are interested!
Recently, Percona introduced Percona Builds for Neon (Introducing Percona Builds for Serverless PostgreSQL), which makes it easy to install and experiment with serverless PostgreSQL. But now, there’s an even more convenient way to explore the capabilities of serverless PostgreSQL — Docker images. In this article, we’ll explore the benefits of using Docker images for experimenting with serverless PostgreSQL and show you how to get started with them.
To understand more about deployment procedures, we need to look a little more at Neon architecture.
There is a section in our Documentation (Introduction to Serverless PostgreSQL) and a short overview of the primary components:
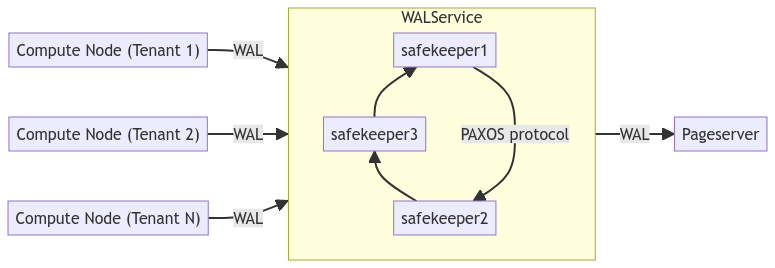
Storage Broker is a coordination component between WAL Service and Pageserver.
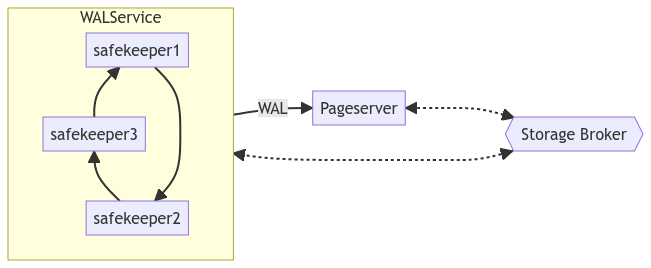
The Pageserver listens for GetPage@LSN requests from the Compute Nodes and responds with pages from the repository.

We published a Docker image with all components in Docker Hub:
perconalab/neon Tags | Docker Hub
And the source code is located in our build repository:
Percona-Lab/serverless-postgresql-build (github.com)
For my experiments, I follow these steps. I prefer to test a distributed deployment where each component is placed on different servers or virtual machines, that’s why I do not put it into docker-compose.
The assumption is that I use a reachable server with IP address 172.16.0.9. Unfortunately, I have to use physical IP addresses for connectivity in multiple servers docker deployment.
1. Deploy storage broker
|
1 2 3 4 |
docker run -d -t --name storagebroker --net=host --entrypoint "storage_broker" perconalab/neon:latest -l 0.0.0.0:50051<code> </code> |
2. Deploy safekeeper (or several of them for redundancy)
|
1 2 3 4 5 |
docker run -d -t --name safekeeper1 --net=host --entrypoint "safekeeper" perconalab/neon:latest --id=1 -D /data --broker-endpoint=http://172.16.0.9:50051 -l 172.16.0.9:5454 --listen-http=0.0.0.0:7676 |
3. Deploy pageserver
|
1 2 3 4 5 6 |
docker run -d -t --name pageserver --net=host --entrypoint "pageserver" perconalab/neon:latest -D /data -c "id=1" -c "broker_endpoint='http://172.16.0.9:50051'" -c "listen_pg_addr='0.0.0.0:6400'" -c "listen_http_addr='0.0.0.0:9898'" -c "pg_distrib_dir='/opt/neondatabase-neon/pg_install'" |
4. Most interesting part – deploy compute nodes (components to handle client requests).
The most interesting part is deploying compute nodes, which are the components that handle client requests. Before we dive in, I need to introduce some new concepts that I’ll describe in more detail in future blog posts, so bear with me for now.
Concept 1: Tenants – Neon has the capability to serve multiple tenants, all located on the same pageserver but visible as separate PostgreSQL instances to clients.
Concept 2: Timelines – Each tenant can have multiple timelines and the ability to branch the current state into a new timeline. At a minimum, a tenant must have one timeline.
Now, let’s get back to deploying compute nodes.
|
1 2 3 4 |
docker run -d -t --name compute --entrypoint "/compute.sh" -p55432:55432 -e PAGESERVER=172.16.0.9 -e SAFEKEEPERS=172.16.0.9:5454 perconalab/neon:latest |
This will create a lightweight PostgreSQL instance (compute node), accessible by port 55432. And you can connect to the instance with a normal PSQL client as:
|
1 |
psql -p55432 -h 127.0.0.1 -U cloud_admin postgres |
Assume we already have a tenant and timeline, and we want to attach a lightweight PostgreSQL instance (compute node):
To get timeline and tenant from the previous start, you can find them in docker logs ( docker logs compute) identified as:
|
1 2 3 4 5 6 7 8 9 10 11 12 13 14 15 16 |
{ "name": "neon.timeline_id", "value": "4b4541ad75370114cd7956e457cc875f", "vartype": "string" }, { "name": "neon.tenant_id", "value": "6c92c037a54c0e3a005cdd4a69d6e997", "vartype": "string" }, docker run -d -t --name compute1 --entrypoint "/compute.sh" -p55433:55432 -e PAGESERVER=172.16.0.9 -e SAFEKEEPERS=172.16.0.9:5454 -e TENANT=51021f53054316c6533d371c9d7e273c -e TIMELINE=e08a6f1526b3ad6249a7b08fc5585e0b perconalab/neon:latest |
This is the most exciting capability: we can fork (branch) existing data into a new timeline (more in the following blog posts):
|
1 2 3 4 5 6 |
docker run -d -t --name compute3 --entrypoint "/compute.sh" -p55435:55432 -e PAGESERVER=172.16.0.9 -e SAFEKEEPERS=172.16.0.9:5454 -e TENANT=6c92c037a54c0e3a005cdd4a69d6e997 -e TIMELINE=4b4541ad75370114cd7956e457cc875f -e "CREATE_BRANCH=1" perconalab/neon:latest |
You are welcome to experiment with Neon using our Docker images.
For feedback and questions, please use our Forums: (Latest Percona Labs/Percona Build for Serverless PostgreSQL topics – Percona Community Forum)
Follow our blog for more information about setups, performance, and unique features of Serverless PostgreSQL.
If you would like to talk with us about builds for Serverless PostgreSQL or stay in touch for future updates – leave your contact details below.
Also, if you are interested in possible Support for Serverless PostgreSQL, fill out the Contact form, and I will get in touch with you.