
ProxySQL is a high-performance SQL proxy that runs as a daemon watched by a monitoring process. The process monitors the daemon and restarts it in case of a crash to minimize downtime.
The daemon accepts incoming traffic from MySQL clients and forwards it to backend MySQL servers.
The proxy is designed to run continuously without needing to be restarted. Most configurations can be done at runtime using queries similar to SQL statements in the ProxySQL admin interface. These include runtime parameters, server grouping, and traffic-related settings.
In this blog, we are discussing various methods to backup and restore ProxySQL. Below are backup methods to perform a backup restore of the ProxySQL server.
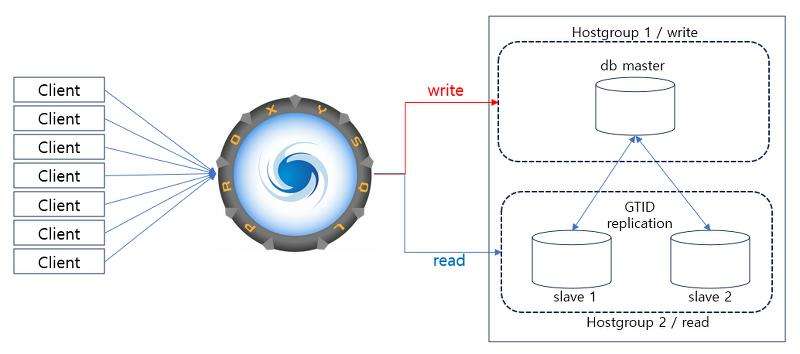
Here will consider ProxySQL configured for async replication with Primary and Replica as shown below in topology.
|
1 2 3 4 5 6 7 8 |
ProxySQLAdmin> select * from runtime_mysql_servers; +--------------+---------------+------+-----------+--------+--------+-------------+-----------------+---------------------+---------+----------------+---------+ | hostgroup_id | hostname | port | gtid_port | status | weight | compression | max_connections | max_replication_lag | use_ssl | max_latency_ms | comment | +--------------+---------------+------+-----------+--------+--------+-------------+-----------------+---------------------+---------+----------------+---------+ | 1 | 192.0.0.1 | 3306 | 0 | ONLINE | 1 | 0 | 1000 | 600 | 0 | 0 | | | 2 |192.0.0.2 | 3306 | 0 | ONLINE | 1 | 0 | 1000 | 600 | 0 | 0 | | +--------------+---------------+------+-----------+--------+--------+-------------+-----------------+---------------------+---------+----------------+---------+ 2 rows in set (0.002 sec) |
ProxySQL backup can be performed by the config file. This method is beneficial in creating multiple instances.
Config backup file can be created by using the below commands and it can be used to start new ProxySQL instances.
|
1 2 3 4 5 6 7 8 9 10 11 12 13 14 15 16 17 18 19 20 21 22 23 24 25 26 27 28 29 30 31 32 33 34 35 36 37 38 39 40 41 |
ProxySQLAdmin> select config into outfile /var/lib/proxysql/proxybkp.cnf; Query OK, 9920 rows affected (0.00 sec) File /var/lib/proxysql/proxybkp.cnf is saved. proxysql $ sudo cat /var/lib/proxysql/proxybkp.cnf |grep -wi mysql_servers -A 35 mysql_servers: ( { hostgroup_id=1 hostname="192.0.0.1" port=3306 gtid_port=0 status="ONLINE" weight=1 compression=0 max_connections=1000 max_replication_lag=600 use_ssl=0 max_latency_ms=0 }, { hostgroup_id=2 hostname="192.0.0.2" port=3306 gtid_port=0 status="ONLINE" weight=1 compression=0 max_connections=1000 max_replication_lag=600 use_ssl=0 max_latency_ms=0 } ) mysql_replication_hostgroups: ( { writer_hostgroup=1 reader_hostgroup=2 check_type="read_only" } |
A ProxySQL backup restore can be performed using mysqldump. It is also possible to dump all (or some) of the tables of ProxySQL’s admin using mysqldump.
mysqldump must be run with –no-tablespaces , –skip-triggers, –skip-add-locks, and –skip-column-statistics
Backup:
|
1 |
$ mysqldump -u admin -p -h 127.0.0.1 -P6032 --no-tablespaces --no-create-info --no-create-db --skip-triggers --skip-column-statistics main mysql_servers > proxy_mysql_servers_bkp.sql |
Restoration:
|
1 2 3 4 5 6 7 8 9 10 11 12 13 14 15 16 17 18 19 20 21 22 23 24 25 26 27 28 |
ProxySQLAdmin> select * from mysql_servers; +--------------+---------------+------+-----------+--------+--------+-------------+-----------------+---------------------+---------+----------------+---------+ | hostgroup_id | hostname | port | gtid_port | status | weight | compression | max_connections | max_replication_lag | use_ssl | max_latency_ms | comment | +--------------+---------------+------+-----------+--------+--------+-------------+-----------------+---------------------+---------+----------------+---------+ | 1 | 192.0.0.1 | 3306 | 0 | ONLINE | 1 | 0 | 1000 | 600 | 0 | 0 | | | 2 | 192.0.0.2 | 3306 | 0 | ONLINE | 1 | 0 | 1000 | 600 | 0 | 0 | | +--------------+---------------+------+-----------+--------+--------+-------------+-----------------+---------------------+---------+----------------+---------+ 2 rows in set (0.00 sec) ProxySQLAdmin> delete from mysql_servers; Query OK, 2 rows affected (0.01 sec) ProxySQLAdmin> select * from mysql_servers; Empty set (0.00 sec) $ mysql -uadmin -p -h 127.0.0.1 -P 6032 -vvv < proxysql_mysql_servers_bkp.sql Enter password: Query OK, 0 rows affected (0.00 sec) Bye ProxySQLAdmin> select * from mysql_servers; +--------------+---------------+------+-----------+--------+--------+-------------+-----------------+---------------------+---------+----------------+---------+ | hostgroup_id | hostname | port | gtid_port | status | weight | compression | max_connections | max_replication_lag | use_ssl | max_latency_ms | comment | +--------------+---------------+------+-----------+--------+--------+-------------+-----------------+---------------------+---------+----------------+---------+ | 1 | 192.0.0.1 | 3306 | 0 | ONLINE | 1 | 0 | 1000 | 600 | 0 | 0 | | | 2 | 192.0.0.2 | 3306 | 0 | ONLINE | 1 | 0 | 1000 | 600 | 0 | 0 | | +--------------+---------------+------+-----------+--------+--------+-------------+-----------------+-------------+-------+--------------------+---------------+ 2 rows in set (0.00 sec) |
If mysqldump version 8.0 is used:
A ProxySQL backup can be performed using the physical snapshot method. Ensure to stop ProxySQL services to get a consistent backup. This method contains the following steps:
Backup:
|
1 2 3 4 |
$ sudo service proxysql stop Redirecting to /bin/systemctl stop proxysql.service $ sudo cp /var/lib/proxysql/* /proxysql_snapshot/ |
Restoration:
|
1 2 3 4 5 6 7 8 9 10 11 12 13 14 15 16 17 |
$ sudo rm -rf /var/lib/proxysql/* $ sudo cp /proxysql_snapshot/* /var/lib/proxysql/ $ sudo chown -R proxysql:proxysql /var/lib/proxysql/ $ sudo service proxysql start Redirecting to /bin/systemctl start proxysql.service ProxySQLAdmin> select * from mysql_servers; +--------------+---------------+------+-----------+--------+--------+-------------+-----------------+---------------------+---------+----------------+---------+ | hostgroup_id | hostname | port | gtid_port | status | weight | compression | max_connections | max_replication_lag | use_ssl | max_latency_ms | comment | +--------------+---------------+------+-----------+--------+--------+-------------+-----------------+---------------------+---------+----------------+---------+ | 1 | 192.0.0.1 | 3306 | 0 | ONLINE | 1 | 0 | 1000 | 600 | 0 | 0 | | | 2 | 192.0.0.2 | 3306 | 0 | ONLINE | 1 | 0 | 1000 | 600 | 0 | 0 | | +--------------+---------------+------+-----------+--------+--------+-------------+-----------------+---------------------+---------+----------------+---------+ 2 rows in set (0.00 sec) |
These methods provide solutions for ProxySQL backups and restores, which play a pivotal role in safeguarding the integrity of your data and providing defense against various disasters, hardware malfunctions, data loss, and corruption. Without reliable backups, the consequences of data loss can be severe, as businesses risk operational disruptions, financial losses, damage to their reputation, and could even result in compliance violations.
If you are interested in more hands-on learning of ProxySQL, Percona’s professional training department offers a one-day, hands-on intensive tutorial covering all things ProxySQL. In the tutorial, we cover the basics of installation and configuration, read-write splitting, async/GR/PXC-based high availability, query firewalling, query whitelisting, results caching, and much, much more. Reach out to us today to schedule your instructor-led class!
Learn more about Percona Training
How to Install ProxySQL From the Percona Repository
Install Percona Server for MySQL
How to set up a replica for replication in 6 simple steps with Percona XtraBackup


Hello,
be aware that
SELECT CONFIG INTO OUTFILEis missing fast query rules data – I have just opened bug for this: https://github.com/sysown/proxysql/issues/4445.