
In my previous post, some time ago, I wrote about the new cluster feature of ProxySQL. For that post, we were working with three nodes, now we’ll work with even more! If you’ve installed one ProxySQL per application instance and would like to work up to more, then this post is for you. If this is new to you, though, read my earlier post first for more context.
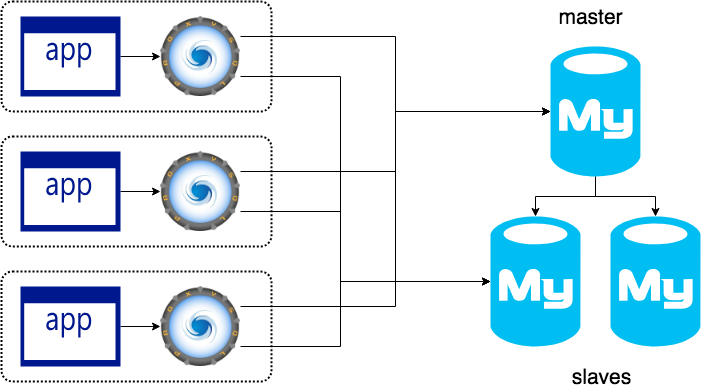
Check the image below to understand the structure of “one ProxySQL per application”. This means you have ProxySQL installed, and your application (Java, PHP, Apache server etc) in the same VM (virtual machine).
Having taken a look at that you probably have a few questions, such as:
Don’t be scared, it’s a simple process.
Remember there are only four tables which can be synced over the cluster. These tables are:
After a fresh installation all those four tables are empty. That means if we configure it as a new node in a cluster, all rows in those tables will be copied instantly.
Generally the installation is straightforward.
Now ProxySQL is up and all the configuration are in default settings
Connect to the ProxySQL console:
|
1 |
mysql -uadmin -padmin -h127.0.0.1 -P6032 --prompt='u (d)>' |
Now there are two steps remaining:
Below is an example showing the minimal parameters to set – you can change the username and password according to your needs.
You can copy and paste the username and passwords from the current cluster and monitoring process by running the next command in a node of the current cluster:
|
1 |
select * from global_variables where variable_name in ('admin-admin_credentials', 'admin-cluster_password', 'mysql-monitor_password', 'admin-cluster_username', 'mysql-monitor_username'); |
You can update the parameters of the current node by using this as a template:
|
1 2 3 4 5 6 7 8 9 10 11 12 13 14 15 16 17 18 19 |
update global_variables set variable_value='<REPLACE-HERE>' where variable_name='admin-admin_credentials'; update global_variables set variable_value='<REPLACE-HERE>' where variable_name='admin-cluster_username'; update global_variables set variable_value='<REPLACE-HERE>' where variable_name='admin-cluster_password'; update global_variables set variable_value='<REPLACE-HERE>' where variable_name='mysql-monitor_username'; update global_variables set variable_value='<REPLACE-HERE>' where variable_name='mysql-monitor_password'; update global_variables set variable_value=1000 where variable_name='admin-cluster_check_interval_ms'; update global_variables set variable_value=10 where variable_name='admin-cluster_check_status_frequency'; update global_variables set variable_value='true' where variable_name='admin-cluster_mysql_query_rules_save_to_disk'; update global_variables set variable_value='true' where variable_name='admin-cluster_mysql_servers_save_to_disk'; update global_variables set variable_value='true' where variable_name='admin-cluster_mysql_users_save_to_disk'; update global_variables set variable_value='true' where variable_name='admin-cluster_proxysql_servers_save_to_disk'; update global_variables set variable_value=3 where variable_name='admin-cluster_mysql_query_rules_diffs_before_sync'; update global_variables set variable_value=3 where variable_name='admin-cluster_mysql_servers_diffs_before_sync'; update global_variables set variable_value=3 where variable_name='admin-cluster_mysql_users_diffs_before_sync'; update global_variables set variable_value=3 where variable_name='admin-cluster_proxysql_servers_diffs_before_sync'; load admin variables to RUNTIME; save admin variables to disk; |
At this point you need keep in mind that you will need to INSERT into this table “all” the IPs from the other ProxySQL nodes.
Why so? Because this table will have a new epoch time and this process will overwrite the rest of the nodes listed by its last table update.
In our example, let’s assume the IP of the new node is 10.0.1.3 (i.e. node 3, below)
|
1 2 3 4 5 6 |
INSERT INTO proxysql_servers (hostname,port,weight,comment) VALUES ('10.0.1.1',6032,0,'p1'); INSERT INTO proxysql_servers (hostname,port,weight,comment) VALUES ('10.0.1.2',6032,0,'p2'); INSERT INTO proxysql_servers (hostname,port,weight,comment) VALUES ('10.0.1.3',6032,0,'p3'); LOAD PROXYSQL SERVERS TO RUNTIME; SAVE PROXYSQL SERVERS TO DISK; |
If you already have many ProxySQL servers in the cluster, you can run mysqldump as this will help speed up this process.
If that’s the case, you need to find the most up to date node and use mysqldump to export the data from the proxysql_servers table.
How would you find this node? There are a few stats tables in ProxySQL, and in this case we can use two of these to help identify the right node.
|
1 |
SELECT stats_proxysql_servers_checksums.hostname, stats_proxysql_servers_metrics.Uptime_s, stats_proxysql_servers_checksums.port, stats_proxysql_servers_checksums.name, stats_proxysql_servers_checksums.version, FROM_UNIXTIME(stats_proxysql_servers_checksums.epoch) epoch, stats_proxysql_servers_checksums.checksum, stats_proxysql_servers_checksums.diff_check FROM stats_proxysql_servers_metrics JOIN stats_proxysql_servers_checksums ON stats_proxysql_servers_checksums.hostname = stats_proxysql_servers_metrics.hostname WHERE stats_proxysql_servers_metrics.Uptime_s > 0 ORDER BY epoch DESC |
Here’s an example output
|
1 2 3 4 5 6 7 8 9 10 11 12 13 14 15 16 |
+------------+----------+------+-------------------+---------+---------------------+--------------------+------------+ | hostname | Uptime_s | port | name | version | epoch | checksum | diff_check | +------------+----------+------+-------------------+---------+---------------------+--------------------+------------+ | 10.0.1.1 | 1190 | 6032 | mysql_users | 2 | 2019-04-04 12:04:21 | 0xDB07AC7A298E1690 | 0 | | 10.0.1.2 | 2210 | 6032 | mysql_users | 2 | 2019-04-04 12:04:18 | 0xDB07AC7A298E1690 | 0 | | 10.0.1.1 | 1190 | 6032 | mysql_query_rules | 1 | 2019-04-04 12:00:07 | 0xBC63D734643857A5 | 0 | | 10.0.1.1 | 1190 | 6032 | mysql_servers | 1 | 2019-04-04 12:00:07 | 0x0000000000000000 | 0 | | 10.0.1.1 | 1190 | 6032 | proxysql_servers | 1 | 2019-04-04 12:00:07 | 0x233638C097DE6190 | 0 | | 10.0.1.2 | 2210 | 6032 | mysql_query_rules | 1 | 2019-04-04 11:43:13 | 0xBC63D734643857A5 | 0 | | 10.0.1.2 | 2210 | 6032 | mysql_servers | 1 | 2019-04-04 11:43:13 | 0x0000000000000000 | 0 | | 10.0.1.2 | 2210 | 6032 | proxysql_servers | 1 | 2019-04-04 11:43:13 | 0x233638C097DE6190 | 0 | | 10.0.1.2 | 2210 | 6032 | admin_variables | 0 | 1970-01-01 00:00:00 | | 0 | | 10.0.1.2 | 2210 | 6032 | mysql_variables | 0 | 1970-01-01 00:00:00 | | 0 | | 10.0.1.1 | 1190 | 6032 | admin_variables | 0 | 1970-01-01 00:00:00 | | 0 | | 10.0.1.1 | 1190 | 6032 | mysql_variables | 0 | 1970-01-01 00:00:00 | | 0 | +------------+----------+------+-------------------+---------+---------------------+--------------------+------------+ |
For each table, we can see different versions, each related to table changes. In this case, we need to look for the latest epoch time for the table “proxysql_servers“. In this example , above, we can see that the server with the IP address of 10.0.1.1 is the latest version. We can now run the next command to get a backup of all the IP data from the current cluster
|
1 |
mysqldump --host=127.0.0.1 --port=6032 --skip-opt --no-create-info --no-tablespaces --skip-triggers --skip-events main proxysql_servers > proxysql_servers.sql |
Now, copy the output to the new node and import into proxysql_servers table. Here’s an example: the data has been exported to the file proxysql_servers.sql which we’ll now load to the new node:
|
1 2 3 4 |
source proxysql_servers.sql LOAD PROXYSQL SERVERS TO RUNTIME; SAVE PROXYSQL SERVERS TO DISK; |
You can run the next SELECTs to verify that the new node has the data from the current cluster, and in doing so ensure that the nodes are in sync as expected:
|
1 2 3 4 |
select * from mysql_query_rules; select * from mysql_servers; select * from mysql_users ; select * from proxysql_servers; |
Run the next command to fetch data from the table stats_proxysql_servers_checksums:
|
1 |
SELECT hostname, port, name, version, FROM_UNIXTIME(epoch) epoch, checksum, diff_check FROM stats_proxysql_servers_checksums ORDER BY epoch; |
Using our example, here’s the data saved in stats_proxysql_servers_checksums for the proxysql_servers table
|
1 2 3 4 5 6 7 8 9 10 11 |
admin ((none))>SELECT hostname, port, name, version, FROM_UNIXTIME(epoch) epoch, checksum, diff_check FROM stats_proxysql_servers_checksums ORDER BY epoch; +------------+------+-------------------+---------+---------------------+--------------------+------------+---------------------+ | hostname | port | name | version | epoch | checksum | diff_check | DATETIME('NOW') | +------------+------+-------------------+---------+---------------------+--------------------+------------+---------------------+ ... | 10.0.1.1 | 6032 | proxysql_servers | 2 | 2019-03-25 13:36:17 | 0xC7D7443B96FC2A94 | 92 | 2019-03-25 13:38:31 | | 10.0.1.2 | 6032 | proxysql_servers | 2 | 2019-03-25 13:36:34 | 0xC7D7443B96FC2A94 | 92 | 2019-03-25 13:38:31 | ... | 10.0.1.3 | 6032 | proxysql_servers | 2 | 2019-03-25 13:37:00 | 0x233638C097DE6190 | 0 | 2019-03-25 13:38:31 | ... +------------+------+-------------------+---------+---------------------+--------------------+------------+---------------------+ |
As we can see in the column “diff” there are some differences in the checksum of the other nodes: our new node (IP 10.0.1.3) has the checksum 0x233638C097DE6190 where as nodes 1 and 2 both show 0xC7D7443B96FC2A94
This indicates that these nodes have different data. Is this correct? Well, yes, in this case, since in our example the nodes 1 and 2 were created on the current ProxySQL cluster
Well, you connect to the node 1 and INSERT the data for node 3 (the new node).
This change will propagate the changes over the current cluster – node 2 and node 3 – and will update the table proxysql_servers.
|
1 2 3 |
INSERT INTO proxysql_servers (hostname,port,weight,comment) VALUES ('10.0.1.3',6032,0,'p3'); LOAD PROXYSQL SERVERS TO RUNTIME; |
You can add the new ProxySQL node IPs to the current cluster before you start installing and configuring the new nodes.
In fact, this works fine and without any issues. The steps I went through, above, are the same, but when you check for differences in the table stats_proxysql_servers_checksums you should find there are none, and that the “diff” column should be displayed as 0.
Here’s a link to the explanation from the ProxySQL wiki page https://github.com/sysown/proxysql/wiki/ProxySQL-Cluster
Proxies monitor each other, so they immediately recognize that when a checksum of a configuration changes, the configuration has changed. It’s possible that the remote peer’s configuration and its own configuration were changed at the same time, or within a short period of time. So the proxy must also check its own status.
When proxies find differences:
version is 1 , find the peer with version > 1 and with the highest epoch, and sync immediatelyversion is greater than 1, starts counting for how many checks they differ
cluster__name___diffs_before_sync and cluster__name__diffs_before_sync itself is greater than 0, find the peer with version > 1 and with the highest epoch, and sync immediately.Note: it is possible that a difference is detected against one node, but the sync is performed against a different node. Since ProxySQL bases the sync on the node with the highest epoch, it is expected that all the nodes will converge.
These next steps run automatically when other nodes detect a change: this is an example for the table mysql_users
The same connection that’s used to perform the health check is used to execute a series of SELECTstatements in the form of SELECT _list_of_columns_ FROM runtime_module
|
1 |
SELECT username, password, active, use_ssl, default_hostgroup, default_schema, schema_locked, transaction_persistent, fast_forward, backend, frontend, max_connections FROM runtime_mysql_users; |
In the node where it detected a difference in the checksum, it will run the next statements automatically:
|
1 2 3 4 |
DELETE FROM mysql_servers; INSERT INTO mysql_users(username, password, active, use_ssl, default_hostgroup, default_schema, schema_locked, transaction_persistent, fast_forward, backend, frontend, max_connections) VALUES ('user_app','secret_password', 1, 0, 10, '', 0, 1, 0, 0, 1, 1000); LOAD MYSQL USERS TO RUNTIME; SAVE MYSQL USERS TO DISK; |
Be careful:
After you’ve added the new ProxySQL node to the cluster, all four tables will sync immediately using the node with the highest epoch time as the basis for sync. Any changes to the tables previously added to the cluster, will propagate and overwrite the cluster
ProxySQL cluster is a powerful tool, and it’s being used more and more in production environments. If you haven’t tried it before, I’d recommend that you start testing ProxySQL cluster with a view to improving your application’s service. Hope you found this post helpful!