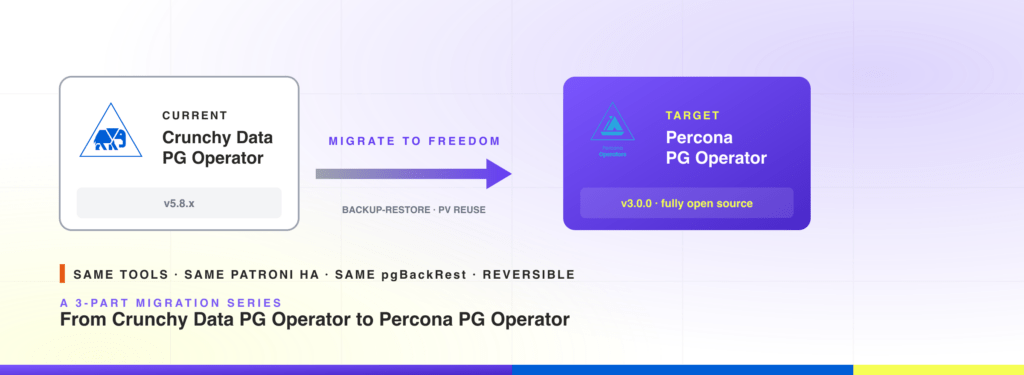
A Percona PostgreSQL operator pgBackRest restore is the simplest way to move off the Crunchy Data PostgreSQL Operator: take a full Crunchy backup, point the new Percona cluster’s dataSource at the existing pgBackRest archive, and the cluster bootstraps from it before its first start. This post covers that path, plus a second option, persistent-volume reuse, for cases where you want to skip the data copy entirely.
This is part 3 of a 3-part series on running PostgreSQL on Kubernetes with a fully open-source operator. Part 1 walked through the changing open-source landscape and announced the hard fork of the Crunchy Data PostgreSQL Operator into the fully independent Percona PostgreSQL Operator v3.0.0. Part 2 covered the standby cluster method, the safest migration path when downtime budget is tight.
This post covers two simpler paths:
If you are landing here cold, start with part 1 for the why, then read Part 2 for the standby method. The rest of this post assumes you have already decided to migrate and want a tested playbook.
| Component | Version |
|---|---|
| Crunchy Data PostgreSQL Kubernetes Operator | v5.8.x (tested on v5.8.7) |
| Percona PostgreSQL Kubernetes Operator | v3.x.x (tested on v3.0.0) |
| PostgreSQL | 18 (must match between source and target) |
| Object storage | SeaweedFS (Apache-2.0), or any S3-compatible service. Required for the backup-and-restore method, optional for PV reuse. |
| Tools | kubectl, helm (v3) |
Different versions may have slight differences in CR fields or behavior. Always consult the official documentation for the operator and PostgreSQL version you are running.
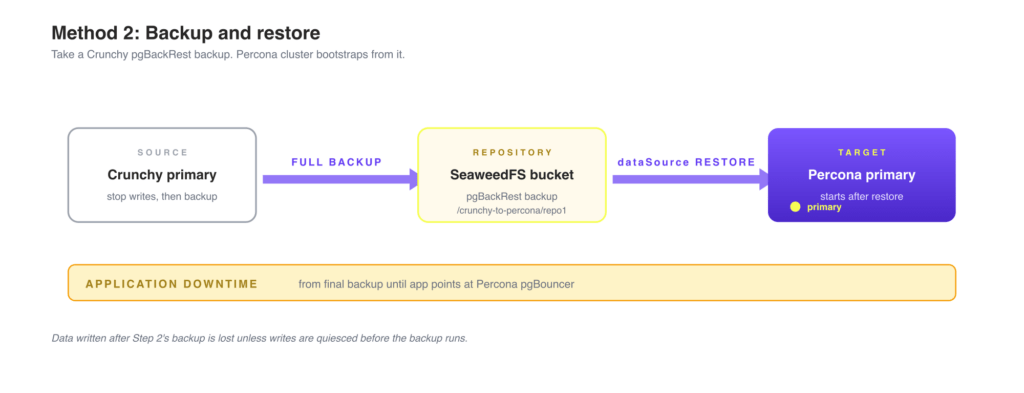
This is often the fastest and simplest path, especially when you do not need a live standby. You take a full backup of the Crunchy source cluster, then create a Percona cluster that automatically restores from that backup before its first start.
Data written between the final backup and the application cutover is lost, so the migration window is the time between those two events. For a near-zero-downtime alternative, see part 2: standby cluster method.
Set the namespace once. Every command in this guide reads from this variable:
|
1 2 |
export MIGRATION_NS=postgres-migration kubectl create namespace $MIGRATION_NS |
Skip this step if you already have an S3-compatible repository (AWS S3, GCS, Ceph). Update the endpoint and credentials in the YAML examples accordingly.
SeaweedFS provides an S3-compatible object store that runs inside Kubernetes. Both operators will use it as the shared pgBackRest WAL archive.
TLS is required. pgBackRest always connects to S3 endpoints over HTTPS, even when repo1-s3-verify-tls: "n" is set (that flag skips certificate verification, it does not fall back to HTTP). The steps below generate a self-signed certificate and pass it to SeaweedFS via Helm values.
|
1 2 3 4 5 6 7 8 9 10 11 12 13 14 15 16 17 18 |
# Generate a self-signed TLS certificate for SeaweedFS S3 openssl req -x509 -nodes -days 3650 -newkey rsa:2048 \ -keyout /tmp/seaweedfs.key \ -out /tmp/seaweedfs.crt \ -subj "/CN=seaweedfs-all-in-one" kubectl -n $MIGRATION_NS create secret tls seaweedfs-s3-tls \ --cert=/tmp/seaweedfs.crt \ --key=/tmp/seaweedfs.key helm repo add seaweedfs https://seaweedfs.github.io/seaweedfs/helm helm repo update helm install seaweedfs seaweedfs/seaweedfs \ --namespace $MIGRATION_NS \ --version 4.23.0 \ -f https://raw.githubusercontent.com/percona/percona-postgresql-operator/refs/heads/migration-from-crunchy-guide/e2e-tests/tests/migration-from-crunchy-backup-restore/examples/seaweedfs-values.yaml \ --wait |
The Helm values file in the repo creates the pg-migration bucket on first start, so no separate aws s3 mb step is needed.
Both operators need credentials to read and write the shared SeaweedFS bucket. Apply the secrets from examples/01-pgbackrest-secrets.yaml:
|
1 2 3 |
# Copy and edit the file first to set your credentials. kubectl apply -n $MIGRATION_NS \ -f https://raw.githubusercontent.com/percona/percona-postgresql-operator/refs/heads/migration-from-crunchy-guide/e2e-tests/tests/migration-from-crunchy-backup-restore/examples/01-pgbackrest-secrets.yaml |
Both contain the same SeaweedFS credentials (pgmigration / pgmigration123). For AWS S3, replace those with your IAM access key ID and secret access key.
If you already have a running Crunchy cluster, ensure its pgBackRest repo1 points at the shared bucket. The repo1-path value must match the path that will be referenced in the Percona dataSource.pgbackrest.global.repo1-path field.
Optional: deploy the Crunchy operator for testing. The Helm install below is shown only as a quick way to reproduce this blog post’s example. The migration steps in the rest of this post do not depend on how you deployed the source operator.
|
1 2 3 4 5 6 |
helm install pgo \ oci://registry.developers.crunchydata.com/crunchydata/pgo \ -n $MIGRATION_NS \ --version 5.8.7 \ --set singleNamespace=true \ --wait |
To start a fresh source cluster for testing, apply examples/02-crunchy-source-cluster.yaml:
|
1 2 |
kubectl apply -n $MIGRATION_NS \ -f https://raw.githubusercontent.com/percona/percona-postgresql-operator/refs/heads/migration-from-crunchy-guide/e2e-tests/tests/migration-from-crunchy-backup-restore/examples/02-crunchy-source-cluster.yaml |
The key pgBackRest settings:
|
1 2 3 4 5 6 7 8 9 10 |
global: repo1-path: /crunchy-to-percona/repo1 # source repo referenced in Percona dataSource repo1-s3-uri-style: path # required for path-style S3 endpoints (SeaweedFS, MinIO) repo1-s3-verify-tls: "n" # skip TLS verification for self-signed cert; remove for AWS S3 repos: - name: repo1 s3: bucket: pg-migration endpoint: seaweedfs-all-in-one.postgres-migration.svc.cluster.local:8443 region: us-east-1 |
Wait for the cluster and its pgBackRest stanza to be ready:
|
1 2 3 4 5 6 7 8 9 10 |
kubectl wait pod \ --selector postgres-operator.crunchydata.com/cluster=crunchy-source,postgres-operator.crunchydata.com/data=postgres \ -n $MIGRATION_NS \ --for=condition=Ready \ --timeout=300s kubectl wait postgrescluster/crunchy-source \ -n $MIGRATION_NS \ --for=jsonpath='{.status.pgbackrest.repos[0].stanzaCreated}'=true \ --timeout=300s |
This is the backup the Percona cluster will restore from. Stop accepting writes on the application side before triggering it to ensure a consistent snapshot, or accept that data written after this backup will be lost.
|
1 2 3 4 5 6 7 8 9 |
kubectl annotate postgrescluster crunchy-source \ -n $MIGRATION_NS \ postgres-operator.crunchydata.com/pgbackrest-backup="$(date +%s)" kubectl wait job \ --selector postgres-operator.crunchydata.com/pgbackrest-backup=manual,postgres-operator.crunchydata.com/cluster=crunchy-source \ -n $MIGRATION_NS \ --for=condition=Complete \ --timeout=600s |
|
1 2 3 4 5 6 7 |
kubectl apply -n $MIGRATION_NS --server-side \ -f https://raw.githubusercontent.com/percona/percona-postgresql-operator/refs/tags/v3.0.0/deploy/bundle.yaml kubectl wait deployment percona-postgresql-operator \ -n $MIGRATION_NS \ --for=condition=Available \ --timeout=120s |
Apply examples/03-percona-restored-cluster.yaml:
|
1 2 |
kubectl apply -n $MIGRATION_NS \ -f https://raw.githubusercontent.com/percona/percona-postgresql-operator/refs/heads/migration-from-crunchy-guide/e2e-tests/tests/migration-from-crunchy-backup-restore/examples/03-percona-restored-cluster.yaml |
The key section that bootstraps the cluster from the Crunchy backup:
|
1 2 3 4 5 6 7 8 9 10 11 12 13 14 15 16 17 |
dataSource: pgbackrest: stanza: db configuration: - secret: name: percona-pgbackrest-secret global: # Must match repo1-path in the Crunchy source cluster exactly. repo1-path: /crunchy-to-percona/repo1 repo1-s3-uri-style: path repo1-s3-verify-tls: "n" repo: name: repo1 s3: bucket: pg-migration endpoint: seaweedfs-all-in-one.postgres-migration.svc.cluster.local:8443 region: us-east-1 |
The Percona cluster’s own backup repository must use a different path from the Crunchy source:
|
1 2 3 4 |
backups: pgbackrest: global: repo1-path: /percona-restored/repo1 # different from Crunchy's path |
As soon as the Custom Resource is applied, the cluster is bootstrapped from the storage referenced in dataSource and then started. Once the cluster becomes ready, you can immediately create new backups; in this case, repo1 from the backups section will be used as the target repository.
Wait for the cluster to reach ready state:
|
1 2 3 4 |
kubectl wait perconapgcluster/percona-restored \ -n $MIGRATION_NS \ --for=jsonpath='{.status.state}'=ready \ --timeout=600s |
Verify the data was restored successfully:
|
1 2 3 4 5 6 |
PERCONA_PRIMARY=$(kubectl get pod -n $MIGRATION_NS \ --selector postgres-operator.crunchydata.com/cluster=percona-restored,postgres-operator.crunchydata.com/role=primary \ -o jsonpath='{.items[0].metadata.name}') kubectl -n $MIGRATION_NS exec "${PERCONA_PRIMARY}" -c database -- \ psql -t -c "SELECT pg_is_in_recovery();" |
Expected output: f. The cluster is the primary and accepts writes.
|
1 2 3 4 5 6 7 8 9 |
kubectl wait perconapgcluster/percona-restored \ -n $MIGRATION_NS \ --for=jsonpath='{.status.state}'=ready \ --timeout=600s kubectl wait perconapgcluster/percona-restored \ -n $MIGRATION_NS \ --for=jsonpath='{.status.pgbackrest.repos[0].stanzaCreated}'=true \ --timeout=300s |
Apply examples/04-post-migration-backup.yaml:
|
1 2 3 4 5 6 7 |
kubectl apply -n $MIGRATION_NS \ -f https://raw.githubusercontent.com/percona/percona-postgresql-operator/refs/heads/migration-from-crunchy-guide/e2e-tests/tests/migration-from-crunchy-backup-restore/examples/04-post-migration-backup.yaml kubectl wait perconapgbackup/post-migration-backup \ -n $MIGRATION_NS \ --for=jsonpath='{.status.state}'=Succeeded \ --timeout=600s |
This creates a clean recovery baseline on the Percona cluster’s own repository. All future PITR restores will use this backup, independent of the Crunchy archive.
|
1 2 |
kubectl get service -n $MIGRATION_NS \ --selector postgres-operator.crunchydata.com/cluster=percona-restored,postgres-operator.crunchydata.com/role=pgbouncer |
Once the migration is verified and your application is connected to the new cluster:
|
1 2 |
kubectl delete postgrescluster crunchy-source -n $MIGRATION_NS helm uninstall pgo -n $MIGRATION_NS |
Until Step 8, rollback is straightforward: switch the application connection string back to the Crunchy pgBouncer service. The Crunchy primary still holds the authoritative state because no writes were directed at the Percona cluster during the cutover (you stopped writes before Step 2). Any writes the application sent to the Percona cluster after cutover will not be present on Crunchy and would need to be replayed manually.
After Step 8, rollback requires restoring the Crunchy cluster from a backup, which is feasible because the original repo1 is still in the bucket.
archive.info missing. The repo1-path in dataSource.pgbackrest.global must match the Crunchy source cluster’s repo1-path exactly:
|
1 2 3 4 5 |
kubectl get postgrescluster crunchy-source -n $MIGRATION_NS \ -o jsonpath='{.spec.backups.pgbackrest.global.repo1-path}' kubectl get perconapgcluster percona-restored -n $MIGRATION_NS \ -o jsonpath='{.spec.dataSource.pgbackrest.global.repo1-path}' |
Restore job fails with TLS errors. pgBackRest requires HTTPS even with repo1-s3-verify-tls: "n". Verify SeaweedFS is reachable:
|
1 2 3 4 5 6 7 8 9 10 11 12 |
kubectl run -i --rm s3-check \ --image=perconalab/awscli \ --restart=Never \ -n $MIGRATION_NS \ -- bash -c " AWS_ACCESS_KEY_ID=pgmigration \ AWS_SECRET_ACCESS_KEY=pgmigration123 \ AWS_DEFAULT_REGION=us-east-1 \ aws --endpoint-url https://seaweedfs-all-in-one.${MIGRATION_NS}.svc.cluster.local:8443 \ --no-verify-ssl \ s3 ls s3://pg-migration " |
Cluster stuck in restoring state. Check the pgBackRest restore job logs:
|
1 2 3 4 |
kubectl logs \ --selector postgres-operator.crunchydata.com/cluster=percona-restored,postgres-operator.crunchydata.com/pgbackrest-restore=percona-restored \ -n $MIGRATION_NS \ -c pgbackrest |
Data missing after restore. The restore captures data up to the latest backup. If post-backup data is critical, re-run the backup on the Crunchy cluster after quiescing writes, then delete and recreate the Percona cluster to restore from the newer backup.
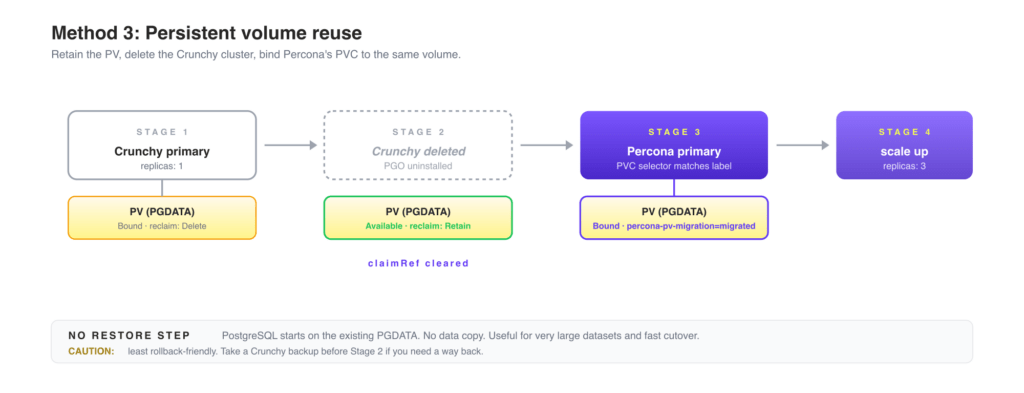
This method reuses the Crunchy primary’s PGDATA persistent volume directly. It avoids a full backup-restore cycle: you retain the Crunchy primary’s PV, delete the Crunchy cluster, then create a Percona cluster whose PVC binds to that same PV. PostgreSQL starts on the existing data directory without any restore step.
It is useful when:
|
1 2 |
export MIGRATION_NS=postgres-migration kubectl create namespace $MIGRATION_NS |
Both operators run in the same namespace. Crunchy PGO is uninstalled during the migration once the PV is retained.
Note (Crunchy): The Helm install for Crunchy PGO below is shown only as a quick way to reproduce this blog post’s example. If you are running Crunchy PGO in production, follow the official Crunchy Data documentation for installation. The migration steps in the rest of this post do not depend on how you deployed the source operator.
Note (Percona): The
kubectl applyof the Percona operator below uses defult configuration ofv3.0.0from the operator repo for reproducibility of this guide. For production deployments, follow the official Percona Operator for PostgreSQL installation documentation to ensure the cluster configuration is properly sized and configured for your workload and traffic requirements.
|
1 2 3 4 5 6 7 8 9 10 11 12 13 14 15 |
helm install pgo \ oci://registry.developers.crunchydata.com/crunchydata/pgo \ -n $MIGRATION_NS \ --version 5.8.7 \ --set singleNamespace=true \ --wait kubectl apply -n $MIGRATION_NS --server-side \ -f https://raw.githubusercontent.com/percona/percona-postgresql-operator/refs/tags/v3.0.0/deploy/bundle.yaml kubectl wait deployment pgo \ -n $MIGRATION_NS --for=condition=Available --timeout=120s kubectl wait deployment percona-postgresql-operator \ -n $MIGRATION_NS --for=condition=Available --timeout=120s |
If you already have a running Crunchy cluster with replicas: 1, proceed to Step 3.
To start a fresh cluster for testing:
|
1 2 3 4 5 6 7 8 |
kubectl apply -n $MIGRATION_NS \ -f https://raw.githubusercontent.com/percona/percona-postgresql-operator/refs/heads/migration-from-crunchy-guide/e2e-tests/tests/migration-from-crunchy-pv/examples/01-crunchy-source-cluster.yaml kubectl wait pod \ --selector postgres-operator.crunchydata.com/cluster=crunchy-source,postgres-operator.crunchydata.com/role=master \ -n $MIGRATION_NS \ --for=condition=Ready \ --timeout=300s |
Stop your application from writing to the database. This is the start of the downtime window. Then identify the primary pod, its PVC, and the backing PV:
|
1 2 3 4 5 6 7 8 9 10 11 12 13 |
PRIMARY=$(kubectl get pod -n $MIGRATION_NS \ --selector postgres-operator.crunchydata.com/cluster=crunchy-source,postgres-operator.crunchydata.com/role=master \ -o jsonpath='{.items[0].metadata.name}') PVC_NAME=$(kubectl get pod -n $MIGRATION_NS "${PRIMARY}" \ -o jsonpath='{.spec.volumes[?(@.name=="postgres-data")].persistentVolumeClaim.claimName}') PV_NAME=$(kubectl get pvc -n $MIGRATION_NS "${PVC_NAME}" \ -o jsonpath='{.spec.volumeName}') echo "Primary pod: ${PRIMARY}" echo "PVC: ${PVC_NAME}" echo "PV: ${PV_NAME}" |
If you want to delete the Crunchy source cluster but keep the persistent volumes, the PV reclaim policy must be set to Retain. For dynamically provisioned PersistentVolumes, the default reclaim policy is Delete, which removes the data once there are no more PersistentVolumeClaims associated with the PV.
|
1 2 3 4 |
kubectl patch pv "${PV_NAME}" \ -p '{"spec":{"persistentVolumeReclaimPolicy":"Retain"}}' kubectl get pv -n $MIGRATION_NS |
Delete the Crunchy cluster and uninstall PGO:
|
1 2 3 4 5 |
kubectl patch postgrescluster crunchy-source -n $MIGRATION_NS \ --type=json -p='[{"op":"remove","path":"/metadata/finalizers"}]' 2>/dev/null || true kubectl delete postgrescluster crunchy-source -n $MIGRATION_NS helm uninstall pgo -n $MIGRATION_NS |
After the PVC is deleted, the PV enters Released state. A Released PV retains its old claimRef and cannot be claimed by a new PVC until it is cleared:
|
1 2 3 4 5 6 |
kubectl patch pv "${PV_NAME}" --type=json \ -p='[{"op":"remove","path":"/spec/claimRef"}]' kubectl wait pv "${PV_NAME}" \ --for=jsonpath='{.status.phase}'=Available \ --timeout=60s |
Label the PV so the Percona PVC selector binds to it exclusively. This prevents accidental binding to another available volume:
|
1 |
kubectl label pv "${PV_NAME}" percona-pv-migration=migrated |
|
1 2 |
kubectl apply -n $MIGRATION_NS \ -f https://raw.githubusercontent.com/percona/percona-postgresql-operator/refs/heads/migration-from-crunchy-guide/e2e-tests/tests/migration-from-crunchy-pv/examples/02-percona-migrated-cluster.yaml |
The key section that binds the PVC to the labelled PV:
|
1 2 3 4 5 6 7 |
instances: - name: instance1 replicas: 1 dataVolumeClaimSpec: selector: matchLabels: percona-pv-migration: migrated |
The Percona Operator creates a PVC with that selector. The PVC binds to the labelled PV, and PostgreSQL starts on the existing PGDATA directory with no restore needed. pgBackRest uses a local PVC-backed repository (repo1.volume), so no S3 credentials or external storage are required, but you can use S3 storage as well.
Wait for the cluster to become ready and verify the data is intact:
|
1 2 3 4 5 6 7 8 9 10 11 |
kubectl wait perconapgcluster/percona-migrated \ -n $MIGRATION_NS \ --for=jsonpath='{.status.state}'=ready \ --timeout=600s PERCONA_PRIMARY=$(kubectl get pod -n $MIGRATION_NS \ --selector postgres-operator.crunchydata.com/cluster=percona-migrated,postgres-operator.crunchydata.com/role=primary \ -o jsonpath='{.items[0].metadata.name}') kubectl -n $MIGRATION_NS exec "${PERCONA_PRIMARY}" -c database -- \ psql -t -c "SELECT pg_is_in_recovery();" |
Expected output: f. The cluster is the primary and accepts writes.
The cluster started with a single replica to reuse the migrated PV. Once the primary is healthy, drop the PVC selector and scale out so the operator can provision fresh replica volumes from the storage class:
|
1 2 3 4 5 6 7 8 9 10 11 12 |
kubectl patch perconapgcluster percona-migrated \ --namespace $MIGRATION_NS \ --type=json \ -p='[ {"op":"remove","path":"/spec/instances/0/dataVolumeClaimSpec/selector"}, {"op":"replace","path":"/spec/instances/0/replicas","value":3} ]' kubectl wait perconapgcluster/percona-migrated \ --namespace $MIGRATION_NS \ --for=jsonpath='{.status.state}'=ready \ --timeout=300s |
Removing the selector here is important: leaving it in place would cause the new replica PVCs to fail provisioning because no other PV carries the migration label.
|
1 2 3 4 5 6 7 |
kubectl apply -n $MIGRATION_NS \ -f https://raw.githubusercontent.com/percona/percona-postgresql-operator/refs/heads/migration-from-crunchy-guide/e2e-tests/tests/migration-from-crunchy-pv/examples/03-post-migration-backup.yaml kubectl wait perconapgbackup/post-migration-backup \ -n $MIGRATION_NS \ --for=jsonpath='{.status.state}'=Succeeded \ --timeout=600s |
This creates the first backup on the Percona cluster’s local pgBackRest repository, establishing a baseline for future PITR restores.
|
1 2 |
kubectl get service -n $MIGRATION_NS \ --selector postgres-operator.crunchydata.com/cluster=percona-migrated,postgres-operator.crunchydata.com/role=pgbouncer |
After the migration is verified, remove the migration label from the PV (Step 6 already removed the PVC selector that depended on it):
|
1 |
kubectl label pv "${PV_NAME}" percona-pv-migration- |
PV migration is the least rollback-friendly of the three methods. Once the Percona cluster has started writing to the PGDATA directory, the original Crunchy timeline is gone. If you need a way back, take a Crunchy-side pgBackRest backup before Step 4 and treat that backup as your rollback point. Recovery is then a fresh Crunchy cluster restored from that backup.
PVC stays in Pending state. The PVC selector did not match the labelled PV. Verify the label and PV phase:
|
1 2 |
kubectl get pv "${PV_NAME}" --show-labels kubectl get pv "${PV_NAME}" -o jsonpath='{.status.phase}' |
PostgreSQL fails to start (data directory errors). Check the database container logs:
|
1 |
kubectl -n $MIGRATION_NS logs "${PERCONA_PRIMARY}" -c database |
If the Crunchy cluster was shut down uncleanly, there may be incomplete WAL. Patroni will attempt crash recovery automatically; check the logs for progress.
PV was deleted before setting Retain. If the PV was deleted along with the PVC (default Delete policy), the data is gone and PV migration is no longer possible. Use the backup-and-restore migration above, restoring from the most recent pgBackRest backup.
Two more migration paths from the Crunchy Data PostgreSQL Operator to the fully open-source Percona PostgreSQL Operator. Combined with Part 2, the series gives you three production-tested options:
All three approaches are safe, predictable, and reversible, with the rollback caveats noted in each section. Because Percona’s operator, images, and tooling are 100 percent open source, you keep full control: you can always migrate back to the Crunchy operator, or out to another open-source operator (Zalando, StackGres, CloudNativePG) using the same patterns. That last journey is a topic for a future post.
This post covers basic deployment patterns and simplified configuration examples. If your environment uses custom images, Crunchy enterprise features, or otherwise needs tailored migration steps, contact the Percona team and we will help you plan and execute the move.
Resources
RELATED POSTS